Archive | frugal & simple RSS feed for this section

Simple Homemade Gift for Cherishing Little Hands

Post by Contributing Writer, Michele Augur.
Those little hands grow so quickly!

Capturing children’s hand prints is always a fun way to cherish precious childhood moments, and share them as gifts with others, too.

For Father’s Day, I embroidered my children’s hand prints, and framed them as a gift for Grandpa.

It didn’t involve any special embroidery techniques; just a straight backstitch. No sewing machine was needed; I did most of the hand stitching in the car on a short road trip!

My small project (with just 2 hand prints) only took a couple hours, and was much less messy than a previous paint project.

I cut a small scrap of unbleached muslin fabric to fit the frame, and each child chose what color thread he/she wanted their hand print to be.

Then, using a pencil (scraped from the bottom of my daughter’s book bag), I traced each child’s hand onto the muslin fabric.

[Ideally, you may want to iron the fabric first, but I was in the car. Guess the wrinkles give it more of that child-made look?]

Then, I just embroidered onto the pencil tracings. I also embroidered the year onto it, since the years fly by so quickly! It’s ok if you’re not an “experienced,” proficient sewer. Those lines can be a bit wiggly; just like those children’s hands!

I added the completed project to a $1 frame, and packaged up the gift. Total cost: Less than $2!

Comments { 14 }

Simple Healthy Summer Meals

Photo Credit: Kirti Poddar

Note from Lindsay: My heart is full this week as I process all the intense images and knowledge I gained this past week in the Philippines. My body is also taking its precious time to adapt to the time change. Sleep has been avoiding me. I’m just trying to take it easy and pray for the Lord’s grace to just focus on my priorities this week. Going to launch right into our June theme where we will be sharing about cultivating simplicity and intentionality in the kitchen. Join us!

Post by Contributing Writer, Michele

Summer is usually a time of impromptu gatherings with friends, overnight visitors, and busy children’s activities in our family. On those hot summer days, standing in front of the oven is the last place I want to be, but everyone still needs to be fed.

To keep from resorting to ice cream for dinner (most of the time), I love having some frugal, simple-prep meals/ingredients on hand, using a combination of “once-a-month” meal preparations, a slow-cooker, and fresh produce.

Beans & Grains

Cook up a big batch of beans. You can put them in the slow cooker, if you just can’t bear to turn on the stove, and put it in your garage or shady porch to cook during the day.

I usually find black beans or chickpeas/garbanzo beans pretty versatile for summer meals. Store extras in freezer containers or baggies (stack bags flat in the freezer) for future meals. You can do the same with grains, such as millet or brown rice. (Cooked rice is perfect for making a fried rice to go along with a stir-fry!)

Some fun summer bean meals:

Photo Credit: roland

Blender Meals

On a hot day, a nutrient-rich smoothie can be a welcome side to a meal. You can make a Green Smoothie or a Fruit Smoothie, adding in plenty of whole milk yogurt or kefir. A chilled, blended soup can be refreshing on a hot evening, such as:

Eggs

When talking with fellow “real food” blogger friends last fall, most of us mentioned the favorite “busy day meal” trio of Popcorn, Smoothies, and Omelets (toss in some garden veggies!). Stuffed Deviled Eggs, Omelets, or even a “breakfast for dinner” of scrambled eggs & soaked waffles are simple, nourishing meals that won’t heat up the kitchen.

Photo Credit: sporkist

Batch Grilling

Not just for burgers; use the barbecue grill, and cook up a whole chicken, big batch of meats, or veggies while the coals are still hot! Leftover cold grilled chicken or beef is perfect for summer salads (such as Southwest Chicken Salad) or sandwiches. Grilled veggies or sausages are delicious in an omelet or soups, as well as Grilled Veggie Sandwiches.

Photo Credit: coanri

Fresh Produce

You may be gleaning produce items from your garden on an as-needed basis (such as lettuce, tomatoes, or carrots). But if you have a veggie drawer or fruit basket full, prep them into salads or veggie trays for quick snacks or appetizers (perfect for those drop-in guests!).

Use a melon baller to make quick work of a large melon, and toss together a fruit salad. A bowl of a nourishing homemade creamy dip is a great option to have on hand, too, with your veggie trays.

Cold salads can be made into meals, too! Stir in some shrimp or canned salmon, and serve in a wrap or stuffed into a bell pepper for a fun picnic meal.

You don’t have to do all your prep-cooking on one day.

Just make extra when you do cook a meal, and put it in the freezer- alongside the Strawberry Ice Cream! What are your favorite summer meals?

Comments { 14 }

How to Make a Flannel Swaddling Blanket

Written by contributing writer, Trina Holden.

Swaddling has been the secret to many babies sleeping well, but most blankets are too small once the baby grows past the infant stage. This blanket is made from a 45in. square of cloth – a generous size for swaddling, draping a car seat, or even a play blanket when the baby is older.

You can often find cute coordinating nursery prints on sale so the total cost of a blanket can be as little as $6.  I love to make them for new moms because I think no one should have a baby without one of these great blankets!

What you need:

1 yard, 10 in. of 45 in. wide flannel fabric

1 yard, 10 in. of 45 in. cotton fabric in a complimentary print or pattern

Matching thread

Scissors

Iron and Ironing board

Sewing machine

Pins

Step One: Trim and Pin

Lay both squares of fabric on top of each other, right sides together. Trim edges to a tidy square. Smooth wrinkles and pin all the way around the four sides.

Step Two: Sew

Sew all around the blanket with a straight stitch, using a ¾ in. seam allowance, and leaving a 6 in. opening for turning.

Step Three: Trim Corners

Clip excess fabric from the four corners of the blanket so the corners will be able to turn nicely.

Step Four: Turn and Press

Turn the blanket right-side out, using a blunt pencil or knitting needle to poke corners out neatly. Iron the blanket, pressing the seam allowances inward at the turning hole – you will be top stitching this closed.

Step Five: Finishing

Set your machine to a decorative stitch if you have one, or just use a zig-zag stitch. Choose a thread that will stand out against your fabric to add to the decorative effect. Sew all around the outside of the blanket at a ¼ in. seam allowance. This will close the opening you used to turn it and keep the blanket from rolling and wrinkling along the edges.

Now go wrap up the nearest baby in your lovely new blanket!

Comments { 23 }

Make Your Own Nursing Cover

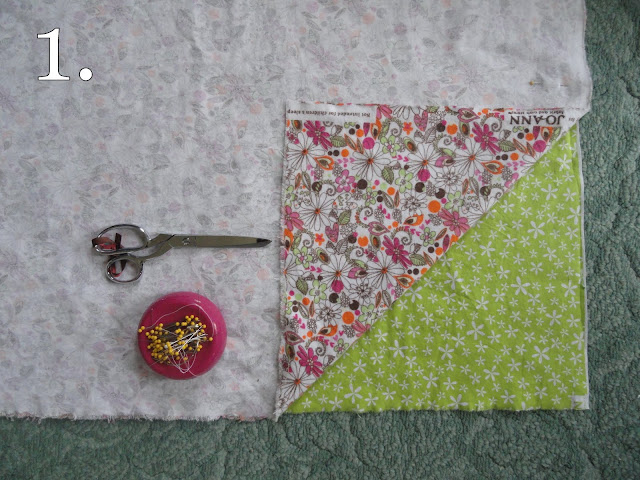
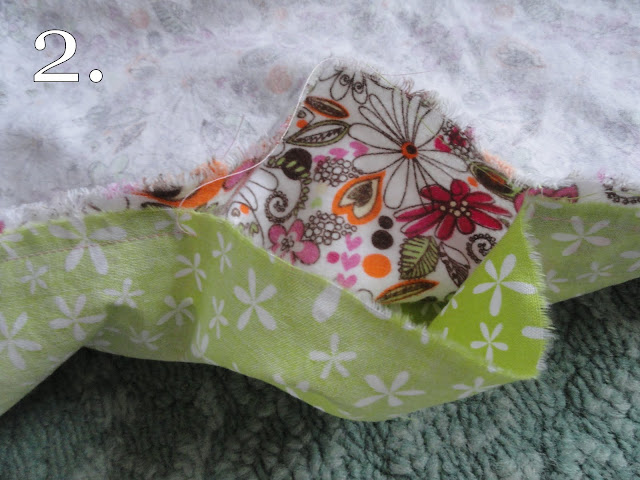
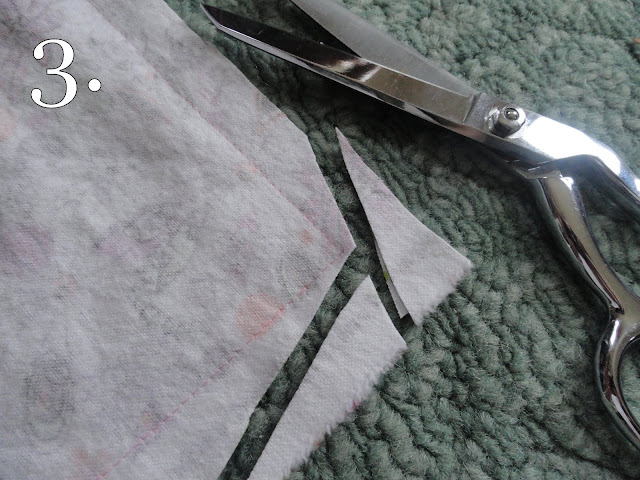
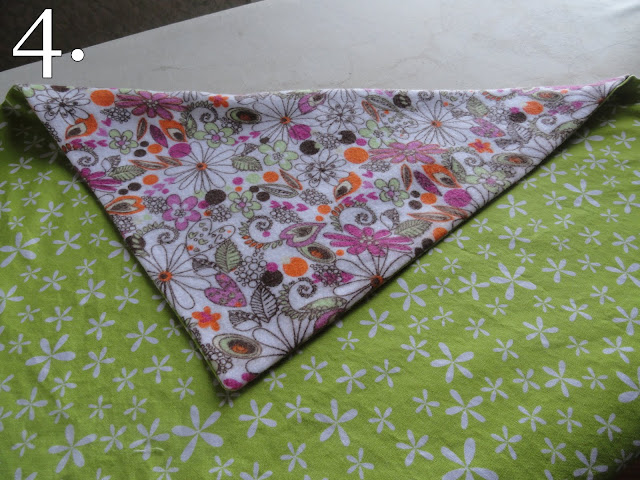
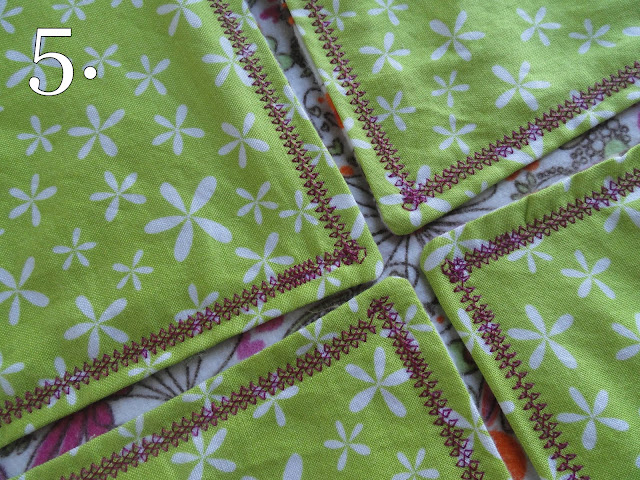
A nursing cover is a huge asset to have as a new mom as you begin exploring the world of breastfeeding. I have been making my own for several years now. I love to give them as gifts to new moms because they are so nice to maintain privacy and comfort on the go. Nursing covers can be relatively expensive and easy enough to make in the comfort of your home with some basic supplies and simple sewing skills. I usually spend no more than $8-10 for all the supplies necessary for this project. Here is a little tutorial of my most recent cover for your use. This is a large nursing cover, measuring about 42″ x 30″ in the completed product. Most of the standard nursing covers on the market are far smaller and make it more awkward to keep yourself fully covered. I purposefully made this latest one significantly larger to test. The recipient shared that it was a huge improvement! You can certainly adapt the pattern to your own needs by adding extra or decreasing in size as desired.

Continue Reading →

Comments { 35 }

Simple Moving Tips

Box #108 headed for the basement

Since our recent move, I have received numerous requests for any simple moving tips I might have to share. Yes! I certainly learned a lot through the process and learned the best tip (#3) from a dear friend who had moved some 30 times! I knew she properly had it down and were worth taking note. So we delay the start of our March theme to talk some practicals.

1. Weed out as much as you can before moving.

My goal was that we would not take anything with us that we did not absolutely want! We sold a bunch of things on craigslist, gave stuff away, or consigned items. This made it so much easier to start fresh.

2. Pack your stuff for their destination room.

Start by picturing your new home and where you would like to relocate your goods. Sketch our a map if desired. Determine as you pack where they will be put in your new home. Chose a color for each new room in your home and then tape a construction piece of paper in that color on the box. When you move the boxes, then you can know easily where each box is going and then it is easy to unpack!

We selected RED as the kitchen color, GREEN as the basement, BROWN as garage, ORANGE as the kids room, etc. If you have a lot of furniture, you could also tape the colored paper on to them as well to indicate destination room. The friends and family that helped move us made several comments that this really speedied up the process of unloading our truck. They quickly were able to recognize and determine the destination of the colors.

3. Make a master spreadsheet of the contents in each box.

Rather than just randomly labeling each box with the contents, we chose to use the number system with a master itemized spreadsheet. I would number each box starting at 100 and make a quick list of the contents of each box on my spreadsheet. Each box would simply get the number written on several sides.

So for example, box 118 contains silverware, pots, pans, and glass vases and had a red piece of paper on the top (indicating its destination was the kitchen). Box 121 contained humidifer, potty chair, travel bags, etc. It worked beautifully!

This was extremely helpful especially in the initial packing stage. If I packed something that I needed it was so easy to find that box and bring out the item and return it to its location after use. Of course the kids got sick in the middle of our packing, so to find the humidifer was easy. I knew it was in box 121, even if there was already 25 boxes packed in our garage. It was also extremely helpful for a speedy unpacking. It seemed a crazy idea initially…but hey, I knew where all my plates were with one quick glass at the spreadsheet!

4. Use red duck tape to label all your essential boxes.

Pick up some red duck tape with which to wrap around all the sides of the boxes of your essentials. This includes anything you will need right away – bathroom stuff, bedding, kitchen essentials, etc. That way you know you need to unpack these first even if you don’t have energy to attack everything else.

5. Keep simple meals for your moving week.

As to meals for your family during a move, I just bought easy freezer meals, canned soup, and burritos for the week. I made sure they were meals that I only need one pot to prepare. I used disposable plates and the like. This made it really easy without mess.

Other means that we found helpful for keeping it frugal: find free moving boxes and paper on craigslist! Then repost them for another’s use when you are done. This left us with just packing tape and duck tape as the only things we had to purchase. Use the help of family and friends to help you move! Feed them a simple lunch, and they will be happy!

Hope that is helpful for any of you all!

Comments { 31 }

Frugal & Natural Christmas Decor

Photo by Michele of frugalgranola.com

This post is written by contributing writer, Michele Augur.

Decorating with found items is both frugal and beautiful! As we bring in items found on walks, our family savors the scents and colors of the season.

I honestly don’t spend a lot of time decorating (and I’m certainly not trained in floral design!), but it is a joy to bless my family and friends with a festive and comfortable atmosphere.

I created the wreath in the photo above, using tree boughs and holly sprigs from the woods around our home. (If you live in the city, ask a neighbor if you can snip some branches from their overgrown holly or juniper bushes!) Carry small pruning shears with you on walks, or just gather fallen items from the ground.

I re-purposed an old wreath frame and floral foam from a dusty old silk flower wreath. (You can often find these at thrift stores or garage sales, or purchase them on sale from craft stores.) I accented with a few of the silk/paper flowers. I also enjoy decorating with dried rosebuds, seed pods, and hydrangeas from summer gardens.

To attach the greenery to the wreath, I used a combination of floral pins (reused from the old wreath) and green floral wire. Some of the branches were also just securely pushed into the floral foam. Mine has a bit of a  “rustic” look, but if you prefer a more classic look, you can trim the branches with pruning shears.

For my thick wreath, floral foam was tied to the wreath frame. (But you could omit the foam, and just tie items directly to the metal wreath frame.) If you don’t have floral wire, you can also attach flowers and holly sprigs with a hot glue gun. I followed Melissa’s advice, and purchased removable hooks to attach a wreath to our glass front door window.

During the past few months, my daughter has enjoyed collecting leaves and other found items to make garlands for our home along with me. For the leaves, she would poke a hole with a toothpick, and then thread them onto string. (This made a simple Thanksgiving decoration.)

You can also add in dehydrated slices of oranges or apples to your garlands. As we approach Christmas, you can create similar garlands out of pine cones or holly, as well.

Photo by Michele of frugalgranola.com

I keep decorating simple by filling bowls, baskets, and cake stands (from thrift stores) with greenery, paper/dried flowers, and fresh fruit. Instead of trying to make formal bouquets, this is a way for little ones to contribute their favorite found items! (We had a bowl of beautiful fall leaves sitting by our front door this past month to greet visitors.)

You can also place some greenery, mossy branches, or holly springs in a vase or pitcher, if desired. (And even use it as a Jesse Tree for Advent!) Just use what you have on hand.

A picture from Lindsay's Christmas table - ornaments in a punch bowl

A bowl of bright red apples is easily replenished with seasonal grocery purchases, and decorated with a holly branch. Some red vintage glass ornaments fill a cake stand, and are accented by simple white candles. Look around your home for glass or wooden bowls or baskets that you could use for the season!

How do you decorate naturally for Christmas?

Comments { 9 }

Striving for a Peaceful, Organized Christmas

Photo Credit

Guest post by Kristi McKenney from Courageous Homekeeping.

As hard as it is to believe, Christmas is just around  the corner.  Are you ready?

Christmas is my very favorite time of year.  I love the decorating, the snow…or at least the hope of snow, the lights, the family traditions, the presents, the cookies and the baking.  Not to mention, the celebration of the birth of our Savior!  I love everything about Christmas.

Except the stress.

Sometimes it is easy to feel overwhelmed and stressed out around Christmastime.  There are so many demands.  For our time, our commitments and our money.

What are the areas where we feel stress this time of year, and how can we minimize that awful stress?

Money

Ooh, that’s a big one isn’t it?  There is always more money that could be spent around Christmas.  Bigger presents, better decorations, more food, more clothing…the list could go on.  Money stress can be a huge deterrent to full enjoyment of the holiday season.  How do you combat it?

Simple.  Make a budget.  And stick to it.  Make a list of people that you will be buying gifts for.  Decide together with your spouse how much you’re comfortable spending on each gift. Make sure to consider  parties, hostess gifts, food preparation, gift wrapping, and all the extra expenses you will be incurring this month.  Agree on limits and stick to them. Start small when your children are young so they don’t grow up with large expectations.

Note from Lindsay: Our Christmas budget is $500 ($250 for personal family gifts, $150 for extended family gifts, $100 for tree, hospitality, and outside holiday entertainment), and this is one we start saving in January. Makes the holidays less stressful for your future reference.

Activities and Commitments

One of the most enjoyable things about the Christmas season is all the activities!  So many volunteer opportunities, parties, family gatherings, etc.  But sometimes there is SO much activity and SO much to do that it feels more like obligation than a joyful opportunity.  How do you make it through without feeling like you’ve been hit by a Mack truck by December 26th?

Sit down with your spouse and make a list of values that are important to you to during the Christmas season. Use the holiday evaluation questions to help guide you in this process. Do you want to make a point to volunteer?  Do you want to have ample time with the family?  How are you going to keep Christ as the focus?  Schedule the things you value on your calendar first as your priorities.  With all the other activities and commitments, decide if they support your values or take away from them.  If they take away from the values you want to keep during the season, don’t be afraid to say no. Limit your Christmas activities to 2-3 for the month and schedule them in now. Any more than this can certainly be overwhelming. Keep it simple and these activities will be so much more enjoyable as a result.

Preparation

After figuring out your money situation, your activities and commitments, it’s time to make some preparation lists.  Think about that company Christmas party.  Are you going to need a new dress?  New shoes?  Are your kids going to need clothing?  Are you going to need to bring a gift?  Are you going to need to bring food?  Thinking about all those things ahead of time will enable you to get things done on your own time.  It will save stress and probably money when you don’t have to run to the store, last minute, to buy one ingredient for a dish you have to make for the next day.

Discontentment

Discontentment is not directly related to the Christmas season, but boy can Christmas bring it out!  We are constantly comparing ourselves to others!

Whenever you have that nasty feeling of discontentment come up, ask yourself if there’s anything about the situation that you can change.  If it’s easily something that is within your control to change than do so!

However, if and when you find yourself in a situation where you’re feeling discontent and there is nothing in the situation you can change, remember this very important thing.  There are two very powerful thing you ALWAYS have control over… your attitude and your focus.

When I am feeling discontent about something, usually it is because I have decided that I don’t measure up in some way.  When I am feeling like that, who or what am I focused on?  Me.  I’m not thin enough, I’m not as pretty, my cooking isn’t as good, my house isn’t as decorated.  Do you see a theme?  Me.  I make it all about me.

And it’s not.

It’s about Jesus.  It’s about memories.  It’s about family.  It’s about love.

So…how are you celebrating Christmas this year?

So, how can you grow in cultivating peace in your home?

Kristi McKenney is a busy and happy wife of 12 years and mother to 5 kids, ages 10, 7 and 4 year old triplets!  She has found contentment in her God-given role, and most of her days are spent under piles of laundry, cleaning, chasing kids, baking cookies and cooking dinner.  You can find Kristi writing full time about God, marriage and family over at www.courageoushomekeeping.com.

Comments { 9 }

Natural Homemade Mascara


Photo by Michele of Frugal Granola

Post written by contributing writer, Michele Augur.

After using activated charcoal as a natural pimple remedy (moisten your face, and dab a little as a “mask” onto the spot; leave on for 15-20 min, then wash off), I realized that it could also work as a natural, inexpensive mascara option!

I have purchased the Aloe Vera Gel from Mountain Rose Herbs, and use the activated charcoal from NaturoKits. I have also found activated charcoal at natural herb stores in bulk.
.Photo by Michele of Frugal Granola

Natural Homemade Mascara

  • 1/8 tsp. Activated Charcoal (about 1/2 capsule)
  • 1/8 tsp. Aloe Vera Gel

Mix together aloe and charcoal. (I use a small baby spoon, since I’m not using them for baby food!) Then, dip in a clean mascara brush wand, pressing it against the inside of the bowl to coat it evenly onto the wand, smoothing out any clumps. Apply to eyelashes as usual. Wait a few seconds before blinking, to let the mascara dry, so that it doesn’t get on your cheeks.

I was able to remove the majority of mascara with a warm washcloth, just like typical mascara. (I haven’t usually purchased “waterproof” mascara, anyway.) The mascara has stayed on well, even when I got teary-eyed during a worship service, but I haven’t tried wearing outside in a downpour yet!

I haven’t tried storing this mixture, as it tends to dry out fairly quickly, and I don’t use makeup everyday. (However, experiment, and see what works for you! It might be feasible to store a little bit in a small airtight jar or makeup “pot.”) I was not able to successfully stuff it into an old mascara container, since this mixture is very thick and does not pour.

Comments { 87 }

Craigslist Tips & Tricks

Photo Credit

If I were to make a list of all the items in our house that we have purchased used off Craigslist, it would probably be 75% of our household furnishings. Let’s see. Queen bed and frame, two chest freezers, two cars, coffee table and end table, high chair, stroller, carriers, file cabinet, car seats, glass jars (i.e. our kitchen pantry storage units), cloth diapers, rocking chair, to name a few. Yes, I love craigslist for all the wonderful goodies you can find for practically every need at less than 1/2 the price of their new counterpart. That being said, it is often easy to get overly consumed with it and just track all the items that come through just to exalt in what amazing deals you can find (am I the only frugal momma that can idolize that?). I do not recommend this pursuit…but if there is something you truly need, make sure to first check Craigslist. You can often find items, especially for babies, that have just seen one child’s use, so it is still practically new.

We have also sold a lot of our junk on Craigslist in a very easy manner. You would be amazed what junk you have that might be valuable to another – an old microwave, cell phones, baby items (strollers, clothes, etc), monitors and various technology, and kitchen appliances, have been on passed on from our house to another happy party. “One man’s toxic sludge is another man’s potpourri”, according to the Grinch, and I have found it to be true. You will also get a higher price for an item you are selling versus offering it a garage sale. We have also made some hilarious encounters over Craigslist as well. On one occasion we sold a air purifier to my midwife. On another occasion, I sold cloth diapers to my friend and contributor, Michele at Frugal Granola.

Craiglist is great way to just give things away. If nothing else, post your clutter for free and see what happens. Our neighbors have tossed large items into the trash before (as we have a community garage dumpster), and we have posted them for free on craigslist (so as to avoid the landfills), and there were gone in under an hour. In this case, we would just post the item on a first come, first serve basis, and include our basic approximate address and leave the item by the door or outside. A simple way to serve the community and be a good steward (who wants an old BBQ filling up half the dumpster?).

Lastly, Craigslist is a great way to test a product. I have frequently purchaced a product used on Craigslist, tried it out, and then re-sold it if I didn’t like it. I did this with a Baby Bjorn carrier. Tried it out. Didn’t float my boat, so I sold it. I also did this with several different cloth diaper styles, strollers, and other items. Many times I have made more than I paid for the item.

We have a few learned a few things along the way that might assist you.

1. Always meet in a public place.

This is a wise practice, if possible, for everyone’s safety. The other benefit is that there will be more guarantee that your buyer will come and not cause a “no show”. I have had numerous times when people said they were coming and never showed up, but this problem was completely solved when we designated a specific location and time.

2. Provide your telephone number.

When posting an ad, include your phone number. I’m one that doesn’t like to post my phone number online, but have found it will significantly increase your chance for making a good and quick sale. The serious buyers will call. The random inquiries will always email.

3. Make an offer.

Don’t be afraid to make an offer on an item, unless you really know that it is a rock bottom price and it will just sell really fast. More times than not I have always got a better price than originally post. This also applies to items you want to sell but don’t really know the value or think that it is not worth much. Ask for a offer. I got twice as much as I thought I could for my microwave by following this tip.

4. Provide pictures and clear descriptions.

Make sure to always include a picture of the item you have for sale, even if it is small and invaluable. People are not interested in items that don’t have pictures. It’s not worth putting the effort into making a post and be lazy to not include a picture. Make your descriptions clear.

5. Utilize the RSS Feed.

If you are on the lookout for an item but don’t want to be checking in every day for something to be posted, subscribe to your specific search with the RSS feature. It’s as simple as entering your search item and then going up to the URL line and selecting the RSS button on the far right. Now all the new postings can be send to your email.

It is important to note that you do need to use a discerning eye when viewing Craigslist. Always use the search bar rather than just viewing the general entries. I have never had a problem exposing myself to anything inappropriate in this fashion. If you are an iPhone or Ipod Touch user, the Craigslist Pro app is a great little tool. It makes searching and selling so easy – 5 minutes or less. You can post an ad completely from your iPhone with the camera feature. You can also subscribe to a feed and it will alert you with a basic alarm feature.

What tips do you have to share?

Comments { 38 }

Homemade Calendula Salve

CalendulaNearing the end of summer, my herb garden is ready for harvest!

This post is written by contributing writer, Michele.

A homemade Calendula Salve is a staple in my homemade remedies box. It is the perfect treatment for chapped hands and faces (such as from winter winds, gardening, or babies’ teething drool), soothing little ones’ scraped knees, or mild burns.

I purchase organic herb seeds inexpensively from Mountain Rose Herbs, along with saving seeds from previous harvests (the most frugal option!) to plant in my garden. If you don’t have access to the fresh flowers, you can also find bulk dried calendula flowers from Mountain Rose Herbs or your local natural food/herb store. If you are harvesting your own flowers, pick the petals later in the morning, after the dew dries, but before the noon heat sets in.

To prepare my Calendula Salve, I have used Hemp Oil, which has a very high percentage of Essential Fatty Acids, and can be especially nourishing for skin conditions, such as eczema or dry skin, while being non-greasy and easily absorbed into skin. However, Olive Oil (which typically has a longer shelf-life) could be substituted instead.

When preparing the salve, make sure not to overheat it! Both the oil and the petals must be kept over low heat to prevent “cooking” them.

This is also a wonderful project for incorporating into learning a home with little ones! They love to harvest the petals, and sprinkle/stir them into the pot, before you turn on the heat. (I prepared my most recent batch along with my own daughter, as well as my visiting youngest sister.)

Salve

Calendula Salve

  • 2 Cups Calendula Petals (not the entire flower “heads”)
  • 1 Cup Hemp or Olive Oil
  • 1/4 Cup Beeswax Pastilles/Pellets
  • 10 Drops Lavender Essential Oil
  1. Pour calendula petals into a stainless steel pot, and add oil. Turn on low heat, and stir to combine. Watch for tiny bubbles in the oil to gauge the temperature- it should not get any warmer than the “tiny bubbles stage!” Continue stirring occasionally over the next 2 hours, keeping the oil gently warm.
  2. Meanwhile, begin gently melting the beeswax in the top of a double boiler (don’t let this get too hot; you’ll want it to be a similar temperature as the oil, when you combine the two).
  3. After 2 hours, strain the petals from the oil. (You can use a fine-meshed strainer, tea filters, or cheesecloth.) Squeeze/press out as much of the oil as you can into a bowl. Then slowly pour the oil into the melted beeswax in the double boiler, stirring to combine. Then stir in the drops of lavender essential oil. (The oil acts as a “preservative,” as well as being a healing and calming ingredient.)
  4. Pour the warm oil into small jars/containers, and allow to cool. Avoid using clear glass, if possible. Choose containers (such as white plastic cosmetic containers or amber/cobalt-colored glass jars) that will help protect the salve from sunlight. (I repurpose containers from purchased shea or cocoa butters.) Store in a cool place.
Comments { 51 }