Archive | frugal & simple RSS feed for this section

How to Make Your Perishable Food Items Last for Two Weeks

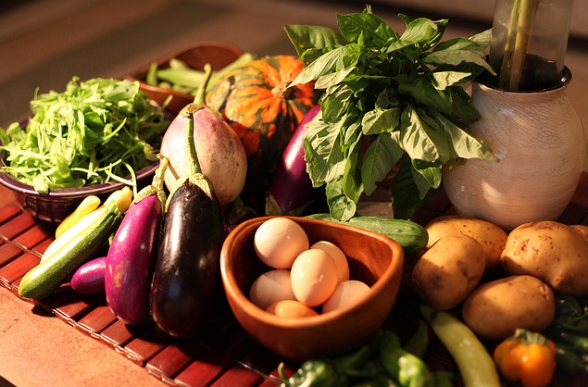
After my recent post on menu planning and sharing my current two week grocery shopping routine, I had several readers ask how I made my produce and perishable items (like dairy & bread) last for a two week period. Here are a few tips I have learned to make it work!

1. Use the more perishable produce items during the first week and save the more hearty produce during the second.

For example, we will use the softer produce, green beans, cucumbers, pears, grapes, etc during the first week and use more of the coniferous vegetables squashes, broccoli, carrots, potatoes, apples, oranges, and such for the second week. Pears and bananas usually take a week to ripen anyway, so they can be consumed later as well, depending upon their ripeness at time of purchase.

So in my menu planning, we will usually eat fresh salads, green beans, zucchini, carrot sticks, and such during the first week, with grapes, pears, bananas, and such for lunches, and then once that is consumed, we will eat squashes, broccoli, steamed carrots and other veggies with our dinners during the second week, and more apples and oranges for breakfasts and lunches. I also occasionally purchase some frozen produce (such as spinach, peas, and corn) during the second week as needed for fillers to throw into many meals. Many vegetables can be blanched and frozen to preserve them. This helps preserve the most nutrients. If you store the lettuce properly, we usually can still have fresh salads in the second week as well.

2. Store produce in airtight containers.

A general rule of thumb is that you can rinse and prepare your produce and store in airtight containers in the fridge to extend their life. For a full extensive list on this practice without using any plastic bags, check out: How to Store Vegetables & Fruit without Plastic. This helpful article explains how many vegetables can be stored wrapped with a damp towel or paper towel. I also have found green bags to be very effective in preserving produce in the past. They can be rinsed and reused many times.

Another effective method is storing a paper towel in a ziploc bag with your produce items (lettuce, cucumbers, zucchini, etc) and that helps absorb the extra moisture from the produce and prevent early spoilage.

A few tips on specific items:

Lettuce – I recommend buying lettuce in airtight sealed bags or plastic 1 lb bins, as this prevents the lettuces from perishing quickly. Many stores carry organic spring salad mixes in these bins, and I have found they last at least two weeks in the fridge, if not longer. Also, many stores sell lettuce in sealed bags that you don’t have to open until needed, which keeps them dry and preserved for much longer than just buying a head of lettuce.

If you choose to buy by the head, you can also rinse and dry your lettuces with a salad spinner. Allow to sit at room temperature for an hour or so until lettuce is completely dry before transferring to the fridge. Store in the airtight container until ready to use.

If my lettuce begins to spoil, I will simply throw it into a green smoothie, and nothing goes to waste!

Bananas – I find it best to purchase bananas in various stages of ripeness so they can be used throughout a two week period. If they start to fade and I cannot get to them, I will simply open them up, cut into small chunks, and stick in a ziploc bag in the freezer to use with smoothies on another occasion. This works really well.

Pears – I store pears on the countertop until they just start to get ripened and then I transfer them to the fridge in a paper bag to preserve them until they can be consumed.

Apples & Oranges – These store well in the same drawer together in the fridge. Apples do give off a gas that can cause other fruits to spoil more quickly, so it is best to keep one drawer for just apples and oranges, since oranges are not affected in the same way.

Berries - I buy all my berries in bulk during the summer time and then freeze them in ziploc bags to use throughout the year for smoothies. The key is not to rinse them until they are ready to be used otherwise they perish quicker in the fridge or clump together in a frozen mess in the freezer.

Onions – I keep these together with potatoes, winter squashes, and other vegetables and fruit that take time to ripen on a shelf in my kitchen. These can also be stored in the fridge to preserve them longer. I try to keep one or two in the fridge at all times, as the refrigeration process seems to eliminate the watery eye syndrome that is common with onions.

Celery - This can be stored upright in a jar with a small amount of water in the bottom to keep them fresh. Cut off the ends and store them by individual stalks. More often then not, I just keep in the original bag and it lasts just fine.

Mushrooms – I usually buy mushrooms by the pre-assembled package to help preserve them. Otherwise, store in a brown paper bag.

Bread- (Obviously, not produce item, but someone asked how I extend the life of my bread) Since we eat a fair amount of bread, I buy a dozen loaves of bread at a local discount organic bread store and store in the freezer and pull out as needed. This prevents any bread from getting moldy.

Milk – We go through about three gallons of milk every two weeks (we certainly could use more but we are also on a budget ;) . I usually buy raw milk for the first week and a half (since that is about as long as it lasts before going sour) and then a gallon of organic milk for the last portion. We just have to make sure we use it slowly but surely and not overindulge to make it last the full two weeks.

Cheese & Butter- These two dairy items freeze very well, so I will buy my cheese in a 5 lb block and cut it into 1 lb chunks and place in ziploc bags in the freezer until needed. Butter can be stored in the original box and pulled out also as needed.

All other dairy products seem to last just fine for the full two week period.

Remember, it will take a bit of trial and error to figure out how much you will consume to make a twice a month shopping excursion work for your family. I know personally, it took me two or three tries before I really figured out how much we needed to eliminate quick trips to the store between the two week cycle. And that’s perfectly normal and okay. I also find it useful to make sure to plan in a extra buffer meal or two (sometime quick and simple (baked potato bar, cans of refried beans for quick burritoes) and dessert, for those impromptu guests and evenings when I just don’t feel up to making a big dinner.

For a complete guide on how to store all your produce, check out this excellent list.
{Photo Credit}

Comments { 39 }

A Pretty Basket Full of Napkins

Guest post by Joanna Rodriguez at Plus Other Good Stuff

When we got married in 2006, we received twelve lovely green cloth napkins. We were living in married student housing and had a tiny table that only fit the two of us. I thought, when am I ever going to use these? We are certainly not having 10 people over for a fancy dinner anytime soon.

I was just starting to embrace healthy living and trying to waste less, so at some point it dawned on me that we could actually use them everyday. I also realized that this would save us money, which we had very little of. And so we began using cloth napkins every day. And we haven’t looked back!

Excuses for Not Using Cloth Napkins

Are you resistant to the idea of using cloth napkins? Maybe some of these thoughts are running through your mind…

Excuse #1: “Cloth napkins are expensive.”

Maybe some are, but there are plenty to be found in thrift stores for mere pennies, and if you’re crafty you can repurpose some fabric that you already have. And it will, of course, save you money in the long run since you won’t be buying disposable napkins anymore!

Excuse #2: “I don’t have time for any more laundry.”

I know, neither do I. Read on to find out how to make this work without adding to your mountain of laundry.

Excuse #3: “Won’t they get stained?”

Yes, they will. And that’s ok. Save special ones for company if you want, and don’t worry about stains on your everyday napkins.

Making it Practical

Over time I’ve streamlined our system so that using cloth napkins doesn’t take any more effort than buying and using paper ones. Here’s what I do:

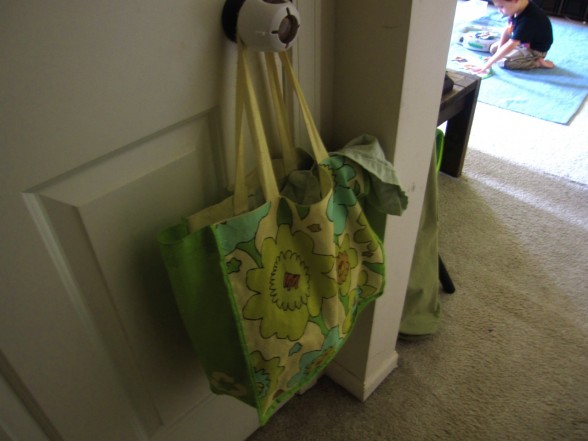
At every meal, we each get a cloth napkin. If it’s dirty at the end of the meal, we throw it in this bag I have hanging on the doorknob to the basement stairs. (That’s also the home for dirty kitchen towels, dish rags, and washcloths used to wipe down the toddler after meals. We make sure to only put dry rags and towels in there, so they don’t get mildewy.)

If a napkin is not dirty enough to wash, it stays on the table to be used again at the next meal. (Since only my husband and I are using them, it’s easy to keep track of whose is whose. But if you have a larger family, try keeping not-so-dirty napkins on the chair of the person who used it.)

When we are running low on clean napkins, I take the contents of the bag down to the basement and throw it in the washer.The napkins are washed with dish rags and kitchen towels, so I’m not doing an extra load just for napkins. We have many more than 12 now (all gathered from thrift stores), so we can go about a week between washings.

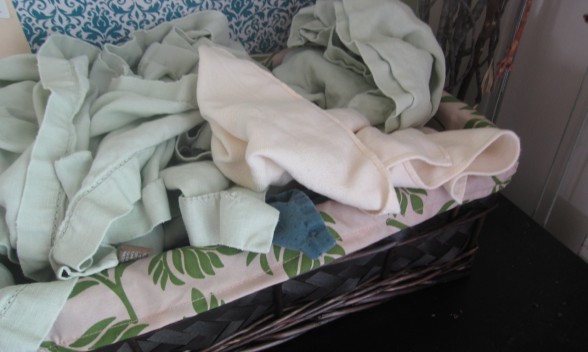
Once they are clean and dry, I separate the load into napkins, dish rags, and kitchen towels. My two-year-old loves to help sort them! I have a plastic bin or basket for each that goes in a designated spot in the kitchen. Here’s my secret:

I don’t fold them.

I just shove them in. I used to fold them, and then I had a baby. Since we mostly use them for our own family, there is no point to keeping wrinkles out. And even when people come over, we are casual enough that I just fold the wrinkled napkins when I set the table. So now you know my other secret:

I don’t iron them. 

Hospitality and Cloth Napkins

When we invite people into our home, one thing I want them to know is that our family is not perfect. I want to invite them into a peaceful, tidy home, but I also want them to see that we are real people, with real wrinkles in our napkins. I hope that if they see that we are real people, they won’t be afraid to share their real selves with us. So be encouraged, you can use cloth napkins, even for company!

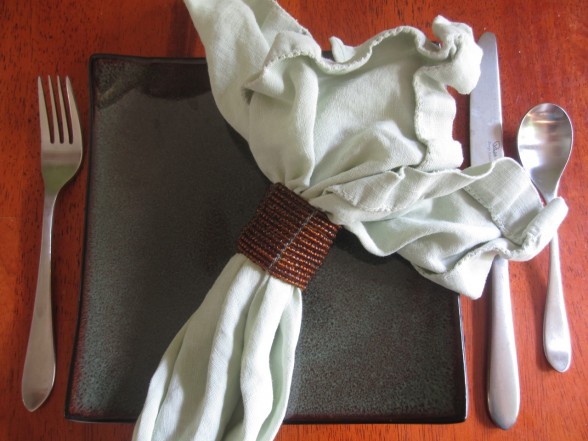
Another tip: if you use napkin rings, the wrinkles are a lot less offensive. ;)

Not convinced yet? 

Besides being frugal and sustainable, here are a few more fun reasons to use cloth napkins:

1. They are beautiful.

2. They are soft.

3. You get to pick your favorite colors!

4. They work a lot better than flimsy paper ones.

5. They make every meal special.

Just one step I take to keep our home green, simple, and frugal.

Do you use cloth napkins? Why or why not?

Joanna Rodriguez is the wife of a future pastor and the mother of two adorable kids, Caedmon and Esther.  She is passionate about Jesus, real food, natural childbirth, breastfeeding, non-toxic living, and the art of dance. As a mostly stay-at-home-mom, she currently spends her days covered in spit-up and surrounded by Tinkertoys. She writes about real food in a positive and welcoming way at Plus Other Good Stuff.

Comments { 84 }

The Man Who Taught Me the Beauty of Simplicity

Three weeks ago a dear family friend, Tony Tuck, passed from this world into glory. You never truly understand the impact of someone’s life until they have departed from this life. As I sat there pondering his story, I realized that he was the man who taught me the beauty and value of simplicity. He was the grandfather I never had.

He lived a quiet life. Just him and his lovely wife. He lived next door to our family for as long as I could remember. I was born and raised on the property that we shared a life together with several other families. Tony was a quiet fellow. He treasured the glories of nature around him. He loved growing beautiful flowers and vegetables and designing amazing creative artistic displays with various pieces of creation and reusing old tattered pieces of life. He built am amazing bridge across the creek that ran below our house out of a huge log and rope. He designed a prayer cabin out in the back woods for quiet times and solitude. He was quiet, and yet he invested in the lives of others every moment of his life. One by one he touched many lives. He never wanted to be the leader, but rather the servant of all.  The slew of kids that grew up on the property experienced his grandfatherly nature.

He would bring us all together for various work projects around the property and after it was complete, he would load us all up in the back of his covered pick up truck and drive us down to dollars corner for malt milkshakes on his treat. It was such a special time. We loved Tony. We loved reading his collection of Tintin comic books. We loved his amazing “darn good noodles” and every other concoction he created. We love his homemade stone pizza oven and the scrumptious homemade pizzas we created there. But most of all, we loved Tony because he cared. He cared for us. He valued spending time with kids. They were his friends.

He didn’t have much, or at least he didn’t flaunt it. His house was simple. Clean. Comfortable. His life was far from hectic. I would watch him and his wife ride bikes around or simply stroll around the property all the time. And yet he taught me the importance of being uniquely present for each one. His presence conveyed comfort, peace, and contentment. He brought beauty into every area of life. He knew that there was more to be heard in silence than in a loud multitude. Tony and his wife welcomed all into their home.

They built a community in our neighborhood of healing and rest. I never saw them stressed, frustrated, or complaining. He loved just being out in nature and cherishing the small beauties.

As I look back, I see this man as a glorious example of simplicity. Life is too precious to rush through in the fast lane. Life is too short to overlook the beauty of creation that we are called to steward and care for. Where is the value in doing so many things and missing out on all these simple beauties? To love and touch one life at a time. That is my desire. To be fully present with each life bestowed into my care. To welcome young and old into our home to enjoy the bounty that God has blessed us with. This is what Tony taught me. And that was beautiful.

Thank you Tony for cherishing the little things. Thank you for being our Grandpa that we didn’t have. Thank you for creating beauty out of the discarded. Thank you for loving each person who entered your life without thought of what you might receive in return. Thank you for giving generously in every area of your life. Your treasure must be great in heaven with you now.

Only one life…

twill soon be past…

Only what’s done

for Christ will last.

Comments { 21 }

How to Wash All Your Laundry in One Day

Yes, it’s crazy. But why not be gutsy and give it a try with me?

With this method, you can get all your laundry out of the way for the entire week. You won’t have to think about it again. It will be folded all at once saving you plenty of time and energy. And your little ones can join in the fun and learn some life skills at the same time.

Things you will need:
A timer (a basic kitchen timer will do or set up a reminder/alarm on your phone)
7 + pairs of clothes for each person in your family (to last a week between washings. We have 7-8 outfits per person with a few extra for the kids for those messes that always come!)
Several sturdy laundry baskets (different colored baskets is nice for sorting for each child or bedroom)
A fun family movie to watch while you fold the laundry together
And the willingness to move quickly

Start first thing on the desired day of chose. I personally prefer Monday morning as it helps give a nice jump into my week. After I am dressed and ready for the day, I get to the laundry room. Begin by hauling all your laundry to your laundry room and sort by colors. Whites (simplify by including white sheets and towels) coloreds, darks (to this jean load I add dark towels) towels (separating bath towels, kitchen towels, and cleaning clothes). I also have a load of cloth diapers. Begin your first load.

This is key: Set your timer for 1 hour. (the Reminders app on the iPhone/touch device works very nice because you can easily change the time with the same reminder throughout the day, but any timer will do).

Continue with your regularly scheduled program.

When your timer goes off, immediately transfer your load into the dryer and add the next load into the wash. Hang any delicate clothes to dry as needed (we hang all my husband and my shirts and dresses and our cloth diapers). Dry clean only clothes can easily be washed in a delicate cycle and then hung to dry.

Include your kiddos in the process. They love transferring clothes from washer to dryer, and sorting clothes teaches them colors and patterns. Plus they are learning basic life skills!

Repeat your timer for 1 hr.

Continue this cycle until all your clothes have made their way through the system. In this manner you can wash upwards of 10 loads a day. I currently wash 6-8 loads every Monday for our family of five.

Lastly, at the end of your day you will have a huge mound of wonderfully clean laundry! Don’t get overwhelmed. Embrace it. It means you are warm and well clothed and God is supplying all your needs.

Have fun with your folding load by snuggling up as a family and watching a fun family movie together (we are currently enjoying Little House on the Prairie). Include everyone in the folding process. Even the little ones can fold towels and help sort into the individual colored baskets. Having a colored basket for each person or room can make the restocking drawers/closets process much easier.

Once clothes are folded and sorted, deliver them to their destinations. You may wish to unload the next morning as we often do. Don’t worry about ironing. That can wait till the next day. If you have a husband like mine, he would appreciate it ironed and hung in a timely fashion. It is just one way to show him I love him without a word.

That is our basic process of washing all our laundry in one day! It leaves us with a clean laundry room for 5-6 days out of the week and our clothes are clean and we don’t have to worry about staying on top of laundry all week long. Just one little way to simplify my life.

It’s really not so crazy after all…do you think? I’ve been following this method since we were married and it continues to work with 3 busy kiddos! A precious moment saved to be used to invest in something more important.

And don’t worry…if it doesn’t work for you, then don’t stress. There is grace for your laundry pile! It will surely get done when it is needed.

Note: We do prefer to hang out all our laundry when possible to conserve electricity, but that is really only doable in the summer months here as it rains throughout the rest of the year. ;) We also usually wash a second load of cloth diapers sometime later in the week for our baby.

Comments { 134 }

Simplifying by Buying Groceries Online

Did you know that it is possible to do the majority of your grocery shopping online these days?
This has certainly be a huge blessing lately while trying to juggle three kiddos and the various responsibilities I have within our home. I have been investigating different options lately in an effort to use my time most productively. Honestly, it is pretty tiring for me to haul all the kiddos to the store. Buying groceries online saves my energy and is a simple way to protect against unnecessary stress.

Additionally, it’s far to easy to buy items that aren’t necessarily on my grocery list when I get in that environment (oh, wouldn’t the kids love trying this? Ahh…coconut milk yogurt, yum!). Surprisingly enough, shopping online has been saving me money!

It has been two year now since I shared my initial real food budget and what food purchases we make at our home. It has certainly changed and been tweaked over this period. With food prices continuing to rise, we have had to adjust and re-evaluate as necessary. I used to shop primarily at our local Trader Joe’s but have become more and more dissatisfied by the lack of freshness and packaged nature of their produce. I also found I had to make multiple stops to get everything I needed because TJ’s doesn’t have that large of selection.

Currently, our food budget is $500-$525 per month and these are the majority of the purchases we make.

Amazon.com 

I am finding myself using the Subscribe & Save feature on Amazon more frequently for finding huge savings on many food items in their Natural & Organic Grocery section. Their selection is growing each time I look. Most of the items are more bulk purchases, but they are non-perishable items, which makes it very possible to spread out their use over a 2-3 month period. With the subscription option, you save an additional 15% and have scheduled deliveries every 1-6 months as you desire. We have prime membership which provides wonderful quick free delivery (even without prime, most items are also available for free shipping if you spend over $25). In this manner, I don’t have to think about it and there is still flexibility to change as you need. You can also cancel at any time. I love food being delivered to my door!

We purchase the following via subscriptions. I have compared them extensively with my other food sources and found Amazon’s prices to be the best: Organic peanut butter, organic raisins, organic coconut milk, vanilla extract, organic coconut oil, maple syrup, gluten-free honey rice cereal (our Sunday morning breakfast), chicken broth (I prefer making my own chicken broth, but I also forget to pull it out of the freezer a lot, so I like having small portions of chicken broth on hand for easy access), toilet paper (yes, you can even save on the basics!), charlie’s laundry soap, mac & cheese (I like having Annie’s on hand for an easy lunch). Amazon also has a growing selection of quality dry goods, including beans and grains.

Safeway Delivery

I am starting to order many random food items (that are not available through my other sources) via Safeway delivery lately. Our budget is $100 per month. The time it saves is worth the slightly increased price. You can save on shipping simply by being flexible as to delivery time or they often offer free shipping if you purchase a certain number of items from their specials list or on orders over $150. I pay no more than $6.95 for delivery in our area. I try to purchase most of my produce organically, and use the Dirty Dozen as my guide. In the summer, I love to use Organics to You for fresh local produce delivered to our door.

Here are the items I purchase through these sources: Organic Milk for making yogurt (1/2 gallon twice a month), lunchmeat, pepperoni, mozzarella, Parmesan cheese, fresh organic produce (bananas, oranges, salad mixes, etc), various other food needs not available through other sources.

Azure Standard 

I appreciate Azure Standard and the bulk natural foods that they offer. We spend about $100 per month through Azure. They deliver to drop spots all over the Northwest and moving more into the Midwest of the US. I buy the following: Brown rice pasta, natural soaps and shampoos, organic crackers, mayonnaise, organic produce, tortillas, raw cheddar cheese, sour cream, soy sauce, olive oil, vinegars, raw honey, spices, condiments, sucanat, oats (other bulk grains and beans), canned wild salmon, tomato soup.

In addition to these purchases, I buy local raw milk & eggs  (1 gallon per week, 2 dozen per week – $68 per month), and we also set aside $100 per month for bulk meat and fruit purchases throughout the year to stock the freezer. We buy 1/4 cow, 1 pig, and about 40 lbs of chicken breasts annually. We buy a dozen loaves of sprouted wheat bread from Dave’s Killer Bread/Healthy Bread Store warehouse (they offer a frozen dozen of sprouted bread for $25). We consume this amount of bread in about 2 months. I continue to make my own jam, salsa, kefir, yogurt, and various pastries as we desire. That’s pretty much it…

Other excellent food delivery sources:

Beyond Organic (this online store has recently been launched birthed out of Jordan Rubin’s book)

U.S. Wellness Meats (find quality grass fed products)

Vitacost (this is another growing option that has a great selection of real foods, vitamins, herbs, and more at deep discounts! I found Eden Organics, Nutivia, Bob’s Red Mill and many other quality brands available here. Many of their products are very comparable to Amazon and Azure Standard too. I just made an order because they sell cod liver oil and other good supplements.) Refer a friend and you both get $10. A fun way to save!

Be sure to search google for specific grocery delivery companies in your area!

Found any good natural food deals lately? Please share!

Note: There are affiliate links in this post for Amazon, so we receive a small percentage of any purchases made through these links. Through your support, we are able to sponsor an orphan home in India.

Comments { 103 }

A Homemade Family Christmas

Photo Credit: ktylerconk

Post by Contributing Writer, Michele of Frugal Granola

Part of the fun of Christmas preparations in our family is involving the little ones in making homemade gifts. Depending on their ages/abilities, the level of their contributions may vary, but they love the feeling of “being in on the surprise.”

It is so sweet to see a child’s joy of giving on Christmas morning, when they say “I made it just for you!” (On the occasion when they admit, “Mama/Daddy helped,” I just respond, “That’s what mommies/daddies are for! You did a wonderful job.” And they smile.)

Some children creatively think of gifts to make for members of the family on their own, while others may prefer an “assigned” project that you work on together. Here are some ideas that allow for little hands, to get you started.

The majority of these projects are intended to be done as a family/with a parent; savor the joy of Christmas together! Many of these gifts are also suitable for friends/neighbors or extended family; tailor it to your family’s gift-giving traditions.

Photo Credit: katerha

For Mama

Photo Credit: James Bowe

For Daddy

Photo Credit: Nico Paix

For Siblings

Gift-making can be a wonderful time of intentionally carving out some quality family time together, as well as practicing generosity for others. You’ll be establishing cherished traditions, valued character traits, and life-long memories!

Comments { 12 }

Frugal, Festive Hair for Your Little Girl (Or You!)

by monthly contributor, Natalie Didlake

Here’s a tutorial on how to get fabulous, Shirley Temple-style curls on your daughter. You’ll love the look, she’ll feel like a princess, and you both will have a great time putting these comfy, easy, and free rollers in!

I have fond memories of holiday eves curling my hair with my mom, and I love making those same memories with my daughter. (The above pic was taken at least 24 hours after her rollers were taken out…still curly! So sorry I didn’t get a better pic.)

Note: I’ve rolled my own hair like this, then pulled it back into a curly ponytail…a thrill for a girl who’s always had straight hair!

WHAT YOU’LL NEED:
- An old sheet, pillowcase, or other discarded cotton
- Brush
- Spray bottle filled with water
- Snacks or other bribe to keep a wiggly child sitting still for 10-15 minutes

WHAT YOU’LL DO:
1. Cut the pillowcase into 2″ x 6″ strips. I have about 20, but thin hair will require less, and thick hair more.

2. Brush out clean, dry hair very smooth. (Hair can also be very slightly damp.)

3. Spritz dry hair from roots to end very lightly with a spray bottle filled with water.

4. Starting at the crown of the head, separate a section about 1″ x 1″, or however much hair you’d use to curl with a curling iron. Brush the section directly away from the head at a 90 degree angle.

5. Put rag on the underside of the hair, at the ends. Roll the hair around the rag tightly, all the way to the roots. Make the sure the ends do not slip out.

6. Tie the rag in a double knot around the hair.

7. Have your daughter sleep on these comfy rollers overnight. If hair feels damp in the morning, run a warm blow drier over the rollers.
8. Carefully unroll the rags, working from roots to ends. Do not try to pull them out!

9. Brush out for frizzy, wavy hair. Don’t brush for ringlet-style curls. Spritz with hair-spray for longer hold, and garnish with a big bow! These curls usually hold almost all day on my lively daughter’s fine, straight hair.

Comments { 20 }

10 Frugal Stocking Stuffers for Children

Written by monthly contributor, Emily Pastor.

I love Christmas Stockings! The mystery and excitement of stocking gifts gets the best of my inner-child every year. Put something in my stocking and you will see a composed, grown woman transform into a runny-nosed girl in footie pajamas right before your eyes. Now that I’m the one “stuffing” these stockings, I’m realizing the challenge of finding both meaningful and cost-effective contents. Those stockings start seeming bottomless when trying to stay within a budget, but I don’t want to fill a stocking with cheap items that just add “stuff” to our lives. Below are some stocking stuffer ideas that are both meaningful and budget-friendly.

Every family holds different traditions, so if Christmas stockings aren’t a part of your Christmas festivities, feel free to use the below ideas for other occasions in which you might need a frugal gift for the little ones in your life.

1. Dress-up Supplies. Do your children like to dress up? Find unique dress-up clothes or accessories at your local thrift store. For a DIY dress-up accessory, try making homemade play silks. Play silks are a wonderful open-ended toy that encourages creativity and hours of imaginative play.

2. Thrift Store Books. Some of my daughter’s favorite books have come from thrift stores for under a dollar. Keep your eyes open for “stocking-stuffer-sized” children’s books next time your at your local thrift store!

3. Homemade Body Products. For older children, whip up a batch of homemade chapstick to last them through the winter. For the teen girl in your family, concoct a lovely-scented homemade sugar scrub and pair it with a new color of nail polish.

4. Homemade snacks. Make-ahead and freeze a batch of your child’s favorite cookie. Bring several out of the freezer on Christmas Eve to thaw. Wrap them in brown paper and twine before placing in their stocking. OR, Compile your own trail mix bag with your child’s favorite dried fruits, nuts and whatever else might suit their fancy.

5. Art Supplies or Projects. Make a batch of Homemade Playdough in vibrant colors. Or, Go to the dollar tree and pick up supplies for this fun art project. Put the supplies in your child’s stocking for an art project you can do together.

6. Unique Foods. Go to a local international market (Asian or Mexican grocery stores are good options) and pick up an exotic fruit or a food item that your family hasn’t tried before. Enjoy sampling your international goodies throughout Christmas day.

7. Homemade Ornaments. Starting a Christmas ornament collection for your children can get rather expensive, especially if you have a handful (or more!) of children. Start a tradition of making each child in your family their own homemade Christmas tree ornament each year as a special keepsake. I especially like these homemade felt ornaments.

8. Mini Photo Album. When I was about three years old, my mom gave me my very own mini photo album in my Christmas stocking. I still have that album to this day, and I can’t tell you how much I loved flipping through the pages year after year. Take time to get some of your year’s best digital photos printed and compile mini photo albums for each child.

9. Kid-friendly Tableware. Most children love having their own special mug, dish set, and placemat. Unique tableware can make frugal and special stocking stuffers for your little ones. Find a unique mug just for your child at a thrift store and fill it with a bag of homemade hot chocolate mix and homemade marshmallows or roll up a different educational placemat for each child’s stocking. If you are a crafty mama, try your hand at sewing placemats and napkins for your children.

10. Words of Affirmation. Encouraging words are perhaps some of the most frugal and meaningful gifts we can give. Write your child a letter about how you are proud of them, how you’ve seen them grow, or how they are a gift to you. It’s okay if your child can’t read yet, you can still bless them by writing and reading them a heartfelt letter.

If you try an idea that’s a hit with your children, consider making that type of gift a tradition that they can expect each year. OR, start a combination tradition where each stocking gets three items year after year such as a book, a letter, and art supplies.
What are your favorite frugal and meaningful stocking stuffers?

Photo Credit

Comments { 12 }

The Blessings of a Small Home

Written by monthly contributor, Emily Pastor.

I grew up in a large home and assumed that’s what I wanted for my family when I got married.  I often felt a twinge of jealousy when I heard of friends my age purchasing their first house while I had to “settle” with a tiny apartment and loud neighbors.

Looking back I am so thankful for living in small spaces and the experience of moving five times in less than 4 years.  Each move left me holding on to my “stuff” with a looser grip and realizing that owning less can be a freeing blessing.

The Lord has used these moves and small apartments to teach me contentment.  The type of contentment where I’m no longer “settling” for less, but when faced with the option, I’m choosing it.  While these trinkets and “necessities” that fill our homes aren’t inherently wrong, they are temporary and fleeting and can easily become burdensome.

In our society we often think that having more than we need is a blessing.  I argue that it can be tiresome and a burden.  If you, like me, are living in a small space and struggle with contentment, here are some reminders of the blessings of less.

1. Less to Clean
Times of cleaning truly bring out my contentment and thankfulness for a small space.  I often think of how much more of my time would be spent cleaning a larger home.  I can vacuum my entire apartment in less than 10 minutes.  I love scrubbing only one toilet!  Dusting is a 10 minute breeze.  With less space I’m able to keep a deeper-cleaned home instead of spending most of my energy keeping things “looking” clean.

2. Less Chasing
When we’ve stayed at my parent’s larger home, I’m always amazed at how exhausted I become from chasing little ones.  I’m sure this isn’t a huge deal when children are older, but with new walkers and wobbly toddlers, chasing can become an all day affair.  Small spaces allow young ones the freedom to move around the house without gates and still be within earshot and eyesight of Mama.

3. Less to Decorate
Small spaces are not only less intimidating to decorate, but they are much more friendly to the decorator on a budget.  I love decorating a small room to be cozy and functional without the pressure to find pieces simply to fill empty spaces.

4. Less to Maintain
Whether large or small, all homes require maintenance.  Appliances break down.  Furniture wears out.  Walls need new paint.  Roofs leak.  Lawns need mowing.  Smaller spaces can reduce the time and money spent on keeping a home maintained and comfortable.

5. Less Space for Clutter
With limited closet and storage space I’m forced to weed out useless clutter due to the lack of clutter hiding spots.  I wouldn’t deal with my clutter nearly as much if it didn’t invade my space so easily.  This lack of space is a blessing!  My space keeps me accountable to what we do and don’t need around the house.

“Now there is great gain in godliness with contentment, for we brought nothing into the world,  and we cannot take anything out of the world. But if we have food and clothing, with these we will be content.” 1 Timothy 6:6-8

Whether you are in a large or small home, may your hearts be filled with contentment, generosity, and thankfulness to the One who provides for our needs so faithfully.

Comments { 56 }

5 Simple Up-cycling Ideas to Beautify Your Home

Guest post by Victoria Coombs from He Holds Everything.

If you’re anything like me there are many things in your home that are not being used but you are having a hard time just getting rid of it! Well, little did you know this is the perfect  place to be! All you need is a little time – trust me, all I have is spurts of time with six kids running around. Here I will list 5 ways to up-cycle, or repurpose, things that are common to most homes.

Dry erase board from a picture frame

Supplies:

An old frame
Scrap paper or fabric
Dry erase marker to use with it

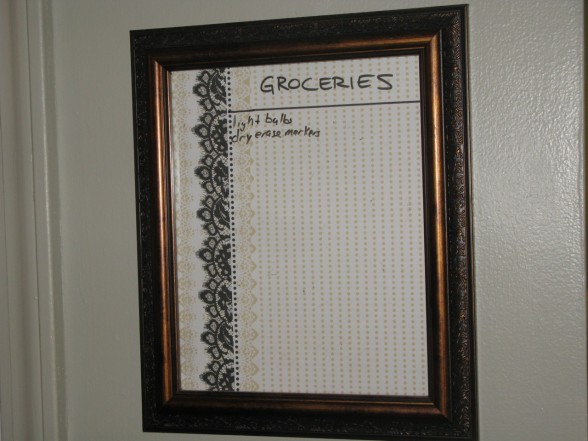
This one is super simple. Take the picture out of the frame, label desired scrap paper with list name –i.e. groceries- and put into the frame (or fabric pulled tight around the frames’ cardboard insert). Keep a dry erase marker nearby to add to your list. Dry erase marker can be erased using a paper towel or rag… honestly, I just use my finger.

Magazine Rack from a closet door

Supplies:

Plantation style bi-fold closet door (one section)
Paint
Magazines to hang on it

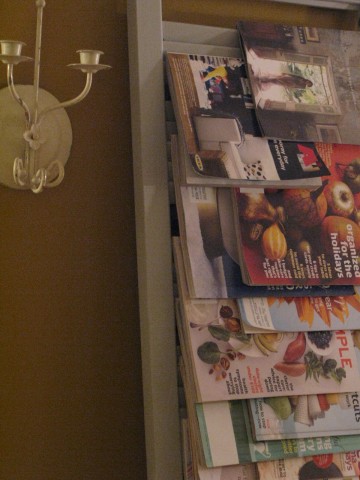
I got this idea from my amazingly creative sister-in-law. All you do is take one section of a plantation style bifold closet door, paint it whatever color you wish, and presto! You have a magazine rack to either lean against a wall or you can secure it to the wall to alleviate floor space. Either way, it’s a much welcome change from the days of having magazines piled high in a basket. Just slide half of the magazine through the slats and let it hang at the binding. This way, each cover is partially displayed for easy selecting.

Yo-yo hair clips from old clothes

Supplies:

Old clothes (I used my daughters’ baby clothes that I adored the pattern of)
Buttons (from old clothes)
Scissors
Two sizes of circle templates – jar lid, CD, small plate, etc.
Sharpie marker
Needle
Thread
Contour hair clips – any clip will do, these are usually just lying around
Hot glue gun or fabric glue

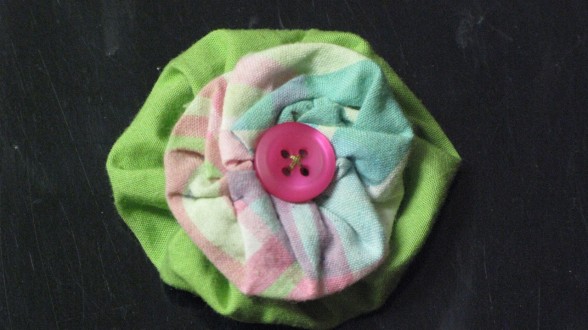
There are definitely more details to these hair clips than to the other ideas, but once you make one you will see how easy it is and find yourself addicted to making them. Trace two circle templates (differing in size an inch or so) with your marker. Once you have cut out your circles, place them good side down. Start from the top of the fabric (bad side), insert your needle through to the underside, then back up to the topside. Do this all the way around the circle. When you get back to where you started pull your thread tight to synch the fabric. Then secure your thread by tying a knot and cutting. Repeat with next piece of fabric and layer them with synched side up. Place button over opening and sew button on through both fabric “flowers”. Secure contour hair clips to the flat side with glue at all corners and let dry.

Candles made from old candle remnants

Supplies:

Cute container – tea cup, jar, or any other cool hollow vessel
Old candle pieces
Tapered candles
Microwave safe container
Knife, or something equally sharp
Stir stick
Skewer

These are great for making your money stretch or as gifts. And you can personalize them to the receiver’s taste or décor! First cut the top part of the tapered candle a half inch smaller than the height of the container (the wick should still be taller than the container). Cut up the left over candles into chunks about an inch cubed. Place cubed wax pieces around the top of the tapered candle to hold it in place. Pack as tightly as possible. Put the remaining pieces of candle into a microwave safe container and place in microwave for thirty second intervals until completely melted. Tie wick of tapered candle around skewer, so that the skewer is resting across the top of your container (this holds the wick in place when the tapered candle begins to melt). Pour melted wax into the container until it reaches right about the top of the tapered candle. Let cool, and enjoy your new creation!

Wall hooks made from skateboard trucks and wheels

Supplies:

Trucks and wheels from a skate board
Screws
Screwdriver

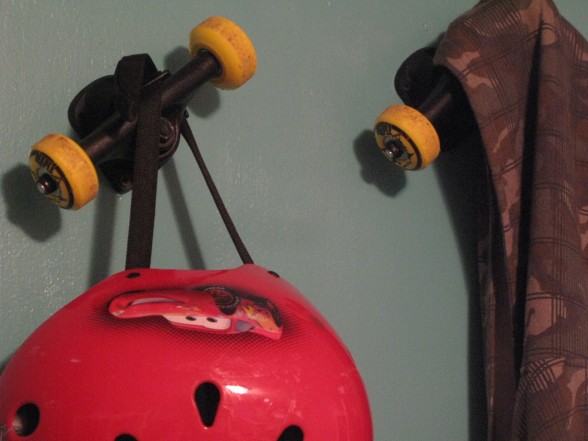
This last one is a super simple idea for a boy’s room. Screw the trucks into the wall in whatever pattern you desire or just one by itself, and use it to hang jackets, backpacks, etc.

Victoria Coombs is a wife to a wonderful husband. Mommy of six in a blended family. My passion is to learn something new every day about my Savior and the world around me. She blogs at He Holds Everything.


Comments { 14 }