Archive | recipes & kitchen tips RSS feed for this section

More Benefits and Sources for Coconut Oil

Organic herbs, spices, teas and oils. Mountain Rose Herbs is a wonderfully superior source of organic unrefined and refined coconut oil, and at the best price around! At $41 per gallon, it is significantly cheaper than even Azure Standard (which is around $34 for 1/2 gallon). If you are interested in hearing more about this excellent oil and its multiple uses, check out these posts.

Natural Body Products on A Budget

Many Health Benefits of Coconut Oil – this is a post by Stephanie’s mom-in-law!

I have greatly been enjoying the use of this product! Lately, I started using it in replacement of lotion. A little dab will do you! But it is wonderful for the skin and hair. I apply it directly to my hair as a conditioner of sorts after getting out of the shower. In eating, I use it to stir-fry, grease my pans (as it is a more solid substance), throw it in smoothies, use it in replacement of oil or butter at times in my baking (usually half and half) and whatever else I can think of! Today I made pancakes and applied it liberally on the pan (more than usual) to prevent sticking…it added a wonderful flavor. Aaron loved it! Normally, you can hardly taste a difference, that is why it works so well!

Comments { 15 }

Desserts: Nutritiously Delicious!

img_1629.JPG

Coconut Brownies topped with Coconut Ice Cream

One of the challenges with eating a healthier diet is that desserts have to go out the window. So I thought. White sugar and white flour are the main ingredients of most of those delicious desserts you see all over the place. As I have been eliminating these two ingredients over the last year or so, I have been on the hunt for making nutritious desserts that you cannot even tell are healthy. That’s what I always hated about healthy desserts…they just looked overly healthy and tasted so as well, and they incorporated expensive ingredients. I am here to say that it is possible!

Continue Reading →

Comments { 37 }

Soaked Whole Grain Bread

img_5213-1
The smell of homemade bread is intoxicating for me! A fresh slice from the oven with a little butter on the top is like a taste of heaven! Especially when this bread comes from your very own oven and is made from quality ingredients, no additives, and soaked for the highest nutritional benefit! Who can ask for better? The question is not whether it will save you money to make your own bread (which I am sure it will all the same), but rather you will know exactly what is being put into your bread! It is all about quality and freshness! Making homemade bread was one of my jobs growing up where it was rather of a burden than a joy to complete, but now that I am married and raising a family, I have come to realize the real value of developing this art!

Read a few benefits here.

Helpful Hints on Successful Bread Making

  1. When possible, use fresh home-milled flour. This will have the highest nutritional content, and the best baking characteristics for higher rising loaves. If this is not possible, store good quality flour in your freezer, but bring it to room temperature before using for the best results.
  2. Use high quality yeast such as SAF Instant Dry Yeast. This is available in quantity at Costco for a good price. Store in the freezer. It will last 2 years or more. If your yeast does not proof, then it is too old!
  3. Remember to proof your yeast! Add your yeast to warm water (between 100-115 degrees) with 1 tsp of honey. This will prepare it for action!
  4. Remember that less flour is best! You should only add just enough flour until the beaters in your mixing bowl are scraping the sides of the bowl clean. If you add too much flour, your bread will be crumbly. Dough should still be slightly sticky before kneading.
  5. Develop the gluten thoroughly. When dough is properly kneaded it will be smooth and elastic. A quick test for sufficient kneading is to take a golfball-sized portion of dough; stretch it between the thumb and index finger of both hands to determine if the gluten is fully developed. The dough should stretch out thin and not tear readily.
  6. Make sure to give your dough two risings! The additional rising will develop flavor, gluten framework and make more fluffy loaves. It is optional, if you are in a hurry.
  7. Only let rise till doubled before baking! This is the mistake I make too often. 30 minutes is a good length of time. If they rise too long the structure of the loaf will become weak and it will sink or fall completely during baking.

img_5212

Homemade Whole Grain Soaked Bread

Learn more about the benefits of soaking here.

11 cups of ground whole wheat flour (you can replace 1 or 2 cups with unbleached white flour for a lighter end result)
1 cup acid medium (kefir, cultured buttermilk, or whey; for dairy intolerant you can substitute with 1/4 cup apple cider vinegar or lemon juice and 3/4 cup water)
3 cups of warm filtered water
2 cups oats
1 cup honey
3/4 cup coconut oil, or butter melted
1/4 cup raw millet, optional
1/4 cup flax seed, optional
1/2 cup water
1 tsp honey
2 1/2 Tbsp active dry yeast
1 1/2 Tbsp sea salt
2-4 Tbsp dough enhancer (I highly recommend this dough enhancer, as it works very well, but you can also replace with any combination of the following: 3 table spoons vital wheat gluten, 1/2 tea spoon soy lecithin, a pinch of citric acid (use sparingly!), and a sprinkling of ginger)
1 cup unbleached white flour or sprouted flour, if necessary
Sunflower seeds, if desired

Directions:

  1. Combine the flour, acid medium, oats, honey, melted oil, millet and flax seeds, and 3 cups of filtered water. Cover and soak at room temperature for 12-24 hours.
  2. After soaking, in a separate small bowl, combine yeast, 1 tsp of honey, and 1/2 cup warm filtered water. Let sit for 5 minutes or so, until fully proofed.
  3. Combine the yeast mixture, soaked flour mixture, and all the rest of the ingredients in your mixer. You may need to add an additional 1-2 cups of flour. Dough should clean the sides of the mixer.
  4. Knead the dough for 10 minutes until the gluten is fully developed.
  5. Remove to a greased bowl and cover with a towel. Let sit until doubled, about 1 1/2 hours.
  6. Punch down, turn dough over, and allow to rise until doubled again, about 45 minutes. (OPTIONAL, but preferred for best results)
  7. Punch down dough and divide into 4 loaves. Roll out with a rolling pin into a rectangle and roll up into a loaf (this makes the perfectly shaped loaves).
  8. Place in greased bread bans and rise again until doubled, about 30-45 minutes minutes (the best place is the oven! Just turn it on low 150-170 degrees till heated and then turn it off, prior to putting the loaves in).
  9. Turn the oven on to 350 degrees and bake for 30-45 minutes. Bread is done when it is fully browned on all sides! Remove from oven, rest in pans for 10 minutes before removing from pans.

Yield: 4 loaves.

If you do not desire to soak your flour, follow these instructions:

You have the option of replacing the 1 cup acid medium with water in the recipe above, so you have a total of 4 1/2 cups of water, or you can use the acid medium and just skip the soaking and proceed as described here.

  1. Combine yeast, 1 tsp of honey, and 1/2 cup of the total water required. Let sit for 5 minutes or so, until fully proofed.
  2. Combine the yeast mixture, remaining 4 cups of water (or 1 cup acid medium & 3 cups water), and all the rest of the ingredients in your mixer. Only add as much flour until it cleans the sides of the bowl.
  3. Knead the dough for 10 minutes until the gluten is fully developed.
  4. Remove to a greased bowl and cover with a towel. Let sit until doubled, about 1 1/2 hours.
  5. Punch down and divide into 4 loaves. Roll out with a rolling pin into a rectangle and roll up into a loaf (this makes the perfectly shaped loaves).
  6. Place in greased bread bans and rise again until doubled, about 30-45 minutes minutes (the best place is the oven! Just turn it on low 150-170 degrees till heated and then turn it off, prior to putting the loaves in).
  7. Turn the oven on to 350 degrees and bake for 30-45 minutes. Bread is done when it is fully browned on all sides! Remove from oven, rest in pans for 10 minutes before removing from pans.

Further Resources

A few excellent articles and tips on making your own homemade bread! Urban Homemaker has an abundance of resources on this topic!

Bread Baking Problems & Solutions
Tips for the Best Bread

Comments { 388 }

Making my own butter!

img_1572.JPG I had such a blast making my own butter yesterday! Yes, that is right! I made my own homemade butter. At first I thought it must be so difficult and time consuming to do it, but boy was I vastly mistaken. It was so easy and well worth it for the wonderful taste! It is cheaper and fresher this route!

INGREDIENTS:

4 cups of heavy cream (raw is preferred, but pasteurized is okay, not ultra-pasteurized) – I skimmed the raw cream off the top of my raw milk I get from a local farm (Read more about the benefits of raw milk here). From 1 1/2 gallons of milk I got 2 1/2 cups of raw cream, I could then just make it out of this, but I went ahead and added some pasteurized cream.
1/2 tsp. salt

Makes 1/2-3/4 lb. of butter and 1/2 quart of buttermilk

I used by Bosch Mixer (my favorite appliance!), but I am sure you could use a KitchenAid or other mixer.

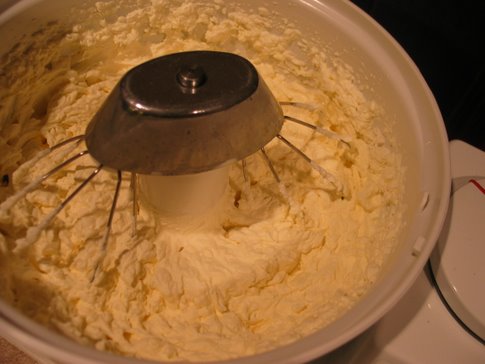
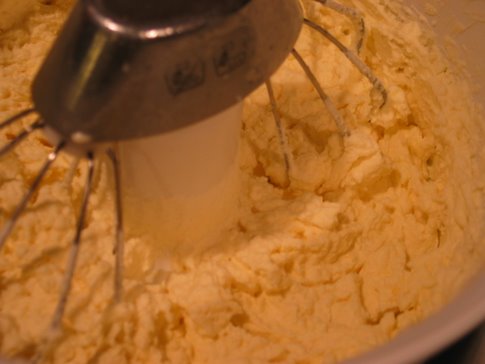
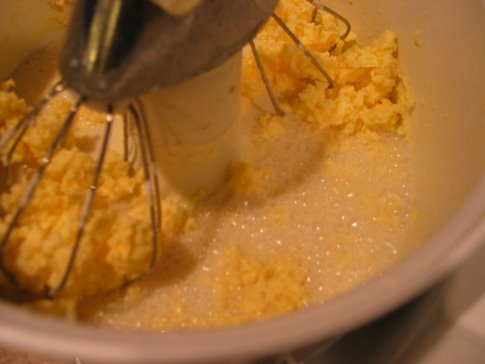
1. Fit your mixer with the plastic beater, or whisk. Blend. The cream will go through the following stages: Sloshy, frothy, soft whipped cream, firm whipped cream, coarse whipped cream. Then, suddenly, the cream will seize, its smooth shape will collapse, and the whirring will change to sloshing. The butter is now fine grained bits of butter in buttermilk, and a few seconds later, a glob of yellowish butter will separate from milky buttermilk. It took about 15 minutes in my machine (I let it do it’s thing while I fed Karis). See the pictures below.

img_1565.JPG

img_1568.JPG

img_1569.JPG

2. Drain the buttermilk. Keep for other uses as it is perfectly good raw buttermilk.

3. Add 1/2 cup of ice-cold water, and blend further. Discard wash water and repeat until the wash water is clear (it took me 3-4 times).

4. Add 1/2 tsp of salt, to taste, if desired.

5. Squeeze out excess water. Take the butter out of the mixer and place on paper towels (or put on a clean towel as I did, since I do not have paper towels) and squeeze out any excess water. You can also place it in another bowl and use two forks or a potato masher to work out the excess water, pour out the water. Another option: put in large covered jar, and shake or tumble. Continue working, pouring out the water occasionally, until most of the water is removed.

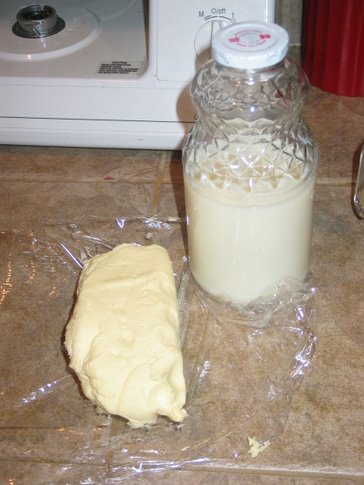
6. Store. The butter is complete! Wrap up in wax paper, or place in a butter plate, or some other container. I froze mine in small glass jars to preserve it longer.

ENJOY! TASTES FABULOUS!

UPDATE 4/7/08 -After much experimenting, I have discovered that homemade butter doesn’t last long at all before spoiling, due to the difficulty it is to remove all the butter fat. It does work well to freeze in portions.

Comments { 103 }

Kitchen Tip: Black Appliances

Over at Tammy’s Recipes today, we are asking a kitchen question. What a fun idea! I am in need of suggestions for keeping my black appliances clean. I have a black sink and stove top that are helpless in keeping clean. They show every bit of dirt, but especially water stains. Is there no options? I believe they are made out of porcelain, if that helps anything. My stove top also accumulates a hard black substance around the gas burners that is crusted in and I can’t scrub off for the life of me. I have tried a scratchy and many different cleaning products, but to no avail. Any thoughts for keeping it shining?

Comments { 33 }

Kitchen Tip: Draining Board

The draining board! AHH! It has been a source of frustration for me. It sure does accumulate with all sorts of hand washable kitchen items and never ceases to be pilled with stuff! Once I clear it off, another pile fills up. Keeping the draining board cleared greatly improves the appearance of your kitchen, I have realized. When dishes are pilled high in this one area of the kitchen, even if everything else is cleared, my entire kitchen looks a mess. I have never had a drying rack, but have always used a towel, as racks seem to accumulate mold, and do not look attractive at all.

I know that air drying your dishes is supposedly better for you, but when they sit there for a day, they are also accumulating dust and dirt!

This week I have set a goal for myself to keep this cleared off, if all possible. When I wash the dishes after the meal, I am going to just dry the dish immediately after washing and put it away. Do away with the draining board all together! I am often just plan lazy!

Check out Tammy’s Recipes for more kitchen tips!

Comments { 9 }

Menu Planning Monday

Okay, so I decided to post my menu this week.on Monday to join in on the fun over at Organizing Junkie!

MONDAY: STIR FRY – Mondays are normally my stir fry night! I try to make a simple stir-fry once a week with lots of vegi’s over brown rice. Hubby is not too much a fan of stir fry but he can handle it once a week.

TUESDAY: LEFTOVER SOUP – as Tuesdays are my soup night, I have some frozen leftover soup in the freezer from last week. Soups freeze so nicely and since I always make a large batch, putting it in the freezer for another meal works great.

WEDNESDAY: CHICKEN ENCHILADAS – Tip: most enchiladas recipes call for condensed soup of some sort. Because most canned soups contain MSG, I always substitute the soup for sour cream. Works great! As we didn’t end of having it last week, I will be using some of the cooked chicken to make a pan of enchiladas (chicken from the whole chicken I cooked up this weekend). I use enchiladas sauce, chilis, olives, whole wheat tortillas and sour cream and layer in a pan. Easy! I will probably serve it with refried beans, corn, and green beans.

THURSDAY: CROCK POT RAGOUT – I love this simple dinner recipe from Sue Gregg. You simply saute 1 lb. ground turkey and then layer in in a dutch oven or crockpot with 1 onion, 6 carrots and 4 potatoes (all thinly sliced). You can also add green beans, corn, peas, as I usually do as well. Throw in a little seasonings (garlic powder, salt, pepper) and 1/2 – 1 cup water and let it cook for 30 minutes. I serve it with some ketchup on top! Excellent and oh so easy for a busy day. In the crockpot, you cook on low for 6 hours, or on high for 2 1/2-3 hours. I will serve with a fresh salad.

FRIDAY: CHILI & CORNBREAD

SATURDAY: LEFTOVERS (as usual!)

My breakfast menu is normally the same each week:

MONDAY – Eggs or Omelet, or French Toast (using homemade bread)
TUESDAY - Oatmeal (see below)
WEDNESDAYKefir Smoothie
THURSDAY – Oatmeal
FRIDAY – Smoothie
SATURDAYPancakes or something special

OATMEAL (for the updated recipe, visit here)
For our regular twice a week breakfast of oatmeal, I soak 1 cup of rolled oats with 1 cup of water and 2 Tbls of kefir (or more!). I let it sit covered overnight. In the morning I put 1 cup of water to boil on the stove. When it is rolling, I add the soaked oats and let it simmer for 15 minutes or so. We then add ground flax seeds, dried cranberries, chopped apples and sometimes a little mashed bananas and there you have an excellent high fiber breakfast.

Got any healthy breakfast recipes to share?

Comments { 18 }

Tuesday Menu Plan & Recipes


Well, I thought I would share my menu for the week today and offer up a few recipes from it for your enjoyment. Maybe next week I’ll actually post it on Monday for Menu Planning Monday. I actually plan my menu and go grocery shopping every two weeks, which has saved me a lot of time and energy. It does take a longer time to plan a two-week menu, but for me it is worth it. It has worked beautifully for me. I do get my produce through another local source, which comes fresh to me on a bi-weekly basis as well. I try to plan around a theme for each night (i.e. Monday is stir fry, Tuesday is soup, Wednesday is chicken dish or Mexican, Thursday is Main Dish Salad, Friday is Italian or casserole, Sat is leftovers). This helps me greatly as I organize my menu, I can work around the theme.

If you are interested in any of my recipes beyond what are provided, please let me know. I would love to share them with you!

Week of December 10

Monday – we spent the evening with my brother and his wife

Tuesday – Curry Split Pea Soup, spelt biscouts (I love using different kinds of grains in my baking, and spelt is an excellent one!), fresh green salad

Wednesday – Chicken Enchiladas, refried beans, corn (I like to buy whole chickens from a local farmer and make several meals with it – this will be the first for the next two weeks!)

Thursday – Chicken Ceasar Salad (marinate the chicken breasts throughout the day and then BBQ them before throwing it all together! Yum!)

Friday – Shepherd’s Pie (a great simple and healthy casserole)

Saturday – leftovers
~~~~~~~~~~~~~~~~~~~~~~~~~~~~~~~~~~~~~~~~~~~~~~~~~~~~~~~~~~~~~~~

Shepherd’s Pie (thanks to Sue Gregg!) -this is a very healthy and low fat version!

8 medium potatoes, peeled or unpeeled (I prefer unpeeled, as there are alot of nutrients in the peels)
8 medium carrots
2 Tbls butter
1/4 cup milk
1/4 tsp salt
1 lb ground turkey
1 medium onion, chopped
2 cups water
6 oz. tomato paste
2 tsp. basil
1 tsp salt
1/4 tsp paprika
1 bay leaf
1 cup fresh mushrooms, sliced
2 cups (10 oz) frozen green beans, green peas, or corn (I like to do a combo of all!)
1/2-1 1/2 cups grated cheddar cheese, optional

Boil potatoes and carrots until soft and tender. Using a mixer, blend together to make mashed potatoes and season as desired with milk, butter, salt and pepper. Brown the turkey and onion in a separate pan. Add the rest of the ingredients (except the cheese), bring to boil, reduce heat and simmer 20 minutes (add mushrooms and beans the last 5 minutes). Remove bay leaf from sauce and pour into 9 x 13 baking pan. Top with the mashed potatoes and carrots. Bake uncovered at 350 for 30 minutes. Top with grated cheese and bake for 10 minutes longer. Makes 6-8 servings.

~~~~~~~~~~~~~~~~~~~~~~~~~~~~~~~~~~~~~~~~~~~~~~~~~~~~~~~~~~~~~~~~~~~

Comments { 3 }

Tuesday Recipes: Waffles/Pancakes


If you haven’t tried Sue Gregg’s waffle/pancake recipe, you need to asap! This is an awesome healthy and nutritious recipe that can be nicely catered to meet your needs (if you have allergies that is). We have this any Sunday when we have guests over and it is always a hit! I had another request for the recipe recently, so that is why I decided to post it today. These can be easily frozen (2 weeks max). I have written some alternative variations at the end. This recipe uses the benefits of soaking the grains to receive all the nutrient value, but you can also substitute the grain for flour (1 cup grain =approximately 1 1/2 cups flour). If we are having it on Sunday, I simply soak them on Saturday night, and throw the remaining ingredients together before they arrive. Easy company dinner and oh so much fun. My husband loves this recipe as pancakes on Saturday mornings. We top with peanut butter and maple syrup. They are very flavorful! Enjoy!

Blender Waffles/Pancakes

Amount: 2 (2 1/2-3 waffles) or 4 (4-5 waffles) or 20-24 pancakes

1. Place in blender; blend at highest speed for 3 minutes.
(3/4) 1 1/2 – 1 3/4 cups buttermilk or kefir (or non-dairy alternative)
(1) 2 Tbls olive oil
(1/2) 1 tsp vanilla extract

(2/3) 1 1/2 cups brown rice or uncooked rolled oats
(or other grain variations, see below) 2/3 cup grain = 1 cup flour or 1 1/2 cups grain =2 cups flour

The batter should always swirl about a vortex in the blender. If it doesn’t, slowly add more liquid until the hole reappears. This is the secret to light and tender waffles. Batter for pancakes may be thicker, but keep batter relatively thin and keep it churning.

2. Cover blender; let stand at room temperature overnight or 12-24 hours.

3. Preheat waffle iron at highest temperature, or griddle on medium high.

4. Just before baking, add and reblend on highest speed for 1 minute:
1 egg, optional additional liquid (if batter needs thinning for vortex or churning)

5. Blend in thoroughly, but briefly (assisted with rubber spatula, if needed):
(1) 2 tsp baking powder
(1/4) 1/2 tsp. baking soda

(1/2) 1 tsp salt, to taste
6. Pour batter onto hot waffle iron, sprayed with olive oil. Bake about 3 1/2 to 4 minutes in waffle iron until crispy.

GRAIN VARIATIONS

brown rice or millet – equal parts of each grain
kamut, spelt, wheat - kamut is a favorite! Combining with kamut and oats is our favorite!
buckwheat – reduce to 1 cup (4 servings). It expands.
barley -hulled, not pearled. Reduce to 1 cup (for 4 servings). It expands
Quinoa - Thoroughly rinse quinoa in strainer the night before 1-2 minutes; let stand in bowl of water overnight; drain and rinse about 1 more minute. This removes bitter flavor. Batter will be very thin. Fill waffle iron almost completely to the edges.
Oats - uncooked rolled oats or oat groats
I use oats in combination with other grains. I use 1/2 cup (in recipe for 4) oats, and 1 cup kamut, or half and half in serving 2.
Other additions - throw in some flax seeds!

Comments { 145 }

More Soup!

Lylah over at Money Making Mamas shares this highly recommended soup recipe from Nourishing Traditions. I like hearing her review and will definitely be trying it now. The recipe and her notes are included below.

Squash and Sun Dried Tomato Soup serves 6
1 butternut squash
2 medium onions, peeled and chopped
3 TB butter
1 cup sun dried tomatoes, packed in oil. I only had sun dried tomatoes in a bag, so, I added a bit of olive oil to the cup and let it sit for a tad.
1 quart chicken stock (I used Trader Joes Chicken Broth and actually I used more than what it called for – it seemed to need to be more brothy.)
1/4 tsp. red chili flakes
2 Tb finely chopped basil (I used fresh from my garden.)Cut squash in half lengthwise and place, cut sides down, in a glass baking pan with about 1/2 inch of water. I chose to liberally douse my squash with olive oil instead. Bake at 350 degrees until tender, about 1 hour.

Meanwhile, sauté onions gently in butter until tender. Add tomatoes, broth and chili flakes. Bring to a boil and skim. Scoop squash out of skin and add to the soup. Simmer for about 1/2 hour. Puree soup with a handheld blender. I didn’t do this – I chose to leave it as it was. Thin with water (I added more chicken broth.) Add basil and season to taste. Simmer gently about 5 minutes, ladle into heated bowls.

Comments { 3 }