Archive | recipes & kitchen tips RSS feed for this section

Health Booster: Garlic!

Garlic! Upon our recent discovery that my husband may have high cholesterol levels, I have been doing research on how to solve the problem. I came across the valuable addition of garlic into our diet for lowering cholesterol. A month previous to this I had purchased a garlic press, and now I am going to use it significantly more.

A diet rich in garlic can have significant health benefits, according to the New York Times. It seems that garlic increases the production of hydrogen sulfide in your blood, which—in the short term—relaxes your blood vessels and increases blood flow. In the long term:

The power to boost hydrogen sulfide production may help explain why a garlic-rich diet appears to protect against various cancers, including breast, prostate, and colon cancer, say the study authors. Higher hydrogen sulfide might also protect the heart, according to other experts.

The downside (if you can call it that)? Benefits from garlic consumption in studies required an equivalent of two medium-sized cloves of garlic per day, and while some countries—namley Italy, Korea, and China—average as high as eight to twelve cloves a day—it may be a lot of garlic by your standards.

Another tip:

To maximize the health benefits, you should crush the garlic at room temperature and allow it to sit for about 15 minutes. That triggers an enzyme reaction that boosts the healthy compounds in garlic.

One person commented the following:

Garlic is extremely easy to grow. It does reasonably well even in Oregon’s mixed weather. Just stick some individual cloves in the ground anywhere on your property this fall and dig them up next summer when their foliage has turned mostly brown.

Read the whole article here.
Comments { 1 }

One Awful Dinner

Have you ever made a dinner that you couldn’t even eat? Now, I have made some very healthy meals that I would not necessarily enjoy but because I knew their health benefits, I would force myself to enjoy it and encourage my husband likewise. Well my dinner last night was far worse. I am actually surprised this hasn’t happened before, as I don’t believe myself to be all that of an experienced cook. It was quite the experience though. Let’s just say we decided we do not like collard greens.

My awful dinner took 1.5 hours to make (that’s probably the worst part!), and included BBQ chicken marinated in my own homemade teriyaki sauce, collard greens with bacon and spices (a recipe that received great reviews from allrecipes.com) , and couscous. Doesn’t sound too bad, right? Well, it wouldn’t have been that bad, except for the fact that my teriyaki sauce didn’t work out like it had before…too salty and disgusting, marinated far too long, and the collard greens smelled so bad after they were done simmering (which took over 45 minutes), that I could only take two bites and then I had to get that dish off my table asap! I couldn’t eat anything else and felt sick to my stomach.

We quickly disposed of all remaining food items down the disposal and fled out of the house without another word. We drove immediately to our local Baja Fresh for a dinner replacement. Wow! That sure was good compared to that one awful dinner! (I just wish I had a picture to share…it did look awful as well ;( )

Maybe the collard greens were too old and overly bitter, or maybe I simmered it for too long, but alas my desire to eat this nutritious vegetable failed miserably. I don’t think it will be entering my house for awhile.

Got an awful meal story to share? Share a laugh with me!

HAPPY THANKSGIVING TO YOU ALL!

Comments { 3 }

Bosch Mixer Review

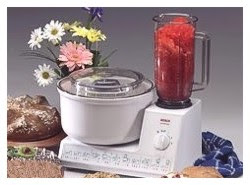
I have found the Bosch Mixer to be my all time favorite kitchen appliance! Not only is it great for making my own bread with its dough hook (you can make up to 6 loaves of bread at one time!), but it has a whisk attachment too for speedy whipping up of ingredients for homemade goodies. Excellent large capacity bowl. It also comes with an awesome blender, the most frequently used item on this machine in my house (plastic blender so no worries of breaking). I have found the blender to be the best around for making smoothies with all those frozen fruits and stuff (you can’t beat 700 watts). Works like a charm with 3 different speeds. They have a really good warranty as well (lifetime on the motor, three years on the parts).

Now this is a spendy item. I believe it is a high quality mixer, bread machine, and blender all in one! If you think about it, the cost is actually significantly less than if you purchased those items separately.

I recommend the purchase of a Bosch mixer through Paula’s Bread, a Christian family run small business. They have excellent resources and customer service. Although the Bosch mixer is spendy, it has been worth every penny! Maybe something you can ask for Christmas? Now your husband may not be up for it at first as mine was but I have definitely won him over with the usefulness of this machine. He has been very impressed!

By the way, my mom bought this machine at least 15 years ago and it is still working awesome for her. We made homemade bread with it regularly growing up.

Comments { 17 }

Homemade Pizza Crust

img_1860.JPG

This is a wonderful recipe to make ahead and freeze. But it can be used at any time! Whenever I am planning my weekly menu and ask my husband for some requests, without fail I can rely on him to request pizza. We make it every two or so weeks at our place.

Homemade Pizza Crust

2 Tbls Yeast
3 1/2 cups water 110F, divided
3 Tablespoons acid medium, for soaking (whey, kefir, yogurt, lemon juice, apple cider vinegar)
1 tsp honey
¼ cup honey
1 Tbls salt
8-10 cups whole wheat flour (or combination with kamut flour)

______________________________________________________________________________

Soaking Step (optional, if you want to skip soaking, proceed with the instructions below the line)

To receive the full nutrients and break down the phytates, try soaking the whole wheat flour in advance, otherwise, skip this step.

Combine 10 cups of flour, 3 cups of water requested in the recipe, substituting some of the water with about 3 Tablespoons of whey, kefir, yogurt, apple cider vinegar, or lemon juice (no need to be exact), and 1/4 cup honey. Allow to soak for 12-24 hours. After soaking, activate the yeast in a small container with the remaining 1/2 cup of warm water and 1 tsp of honey. Allow to foam up for about 5 minutes. Add the proofed yeast mixture to the soaked flour, along with the salt. Knead for 5-10 minutes. If recipe is still sticky, add a little more flour as needed until it is able to be kneaded. Continue with recipe below.

_____________________________________________________________________________

Preheat over to 500 degrees (if you are baking right away). Combine yeast, 2 cups of warm water, and a teaspoon of sugar or honey in a bowl, cover and let sit for 7-10 minutes. Add water, honey, and salt. Mix thoroughly. After dissolved, add flour bit by bit, beating thoroughly. After all flour is beated in; knead 5-10 minutes. Let rise for thicker pizza dough. Divide into four sections for four crusts. Bake for 10-15 minutes.

This works wonderful with all whole wheat flour (hard white or red wheat) or with a combination with kamut flour (provides a lighter texture). Whole wheat pastry flour makes it very crumbly. Great easy recipe and tastes fabulous!

Here are some topping recommendations (these are my hubby’s favorites!): Pepperoni, cheese, Italian sausage, green peppers, garlic salt, Italian seasoning, Parmesan cheese

Enjoy!

For the Freezer

Mix dough completely as instructed and then divide into 4 portions. Freeze the dough in individual Ziploc bags. You do not have to pre-bake the dough – simply put the dough immediately into the freezer. When you are ready to use, thaw in the refrigerator for several hours, bring to a room temperature and then roll out and assemble as desired.

Comments { 123 }

More Kefir Resources

Here is a website that my sister-in-law Autumn directed me to with more information on the kefiring process (click here to read our previous discussion about this). I found out some interesting information about caring for and storing your grains. The following says that grains don’t need to be rinsed between uses after all:

 As long as utensils are kept clean and ingredients are fresh and of the highest quality, rinsing kefir grains is not necessary. Rinsing kefir grains came about after the mother-culture including kefir were introduced to the rest of the world. It came about in recent years, possibly due to concerns regarding weed microorganisms settling on the grains. The robust nature and properties of the microflora, and possibly the physics behind the grains themselves, are effective inhibitors or can antagonize the growth of weed organisms. I am able to exploit this very nature of kefir, by implementing kefir as a natural preservative for preserving fresh foods in solutions containing as little as 10% kefir or kefir-whey, with exceptionally good results.

Comments { 4 }

Health Booster: KEFIR!


Previous to getting married, my future mother-in-law first started to try to win me over to the kefir user crowd, and I thought, “I am not that crazy of a health-nut! I will never use that stuff…” Low and behold it wasn’t long before I thought I would give it a try. Maybe it was to impress her, I don’t know. Now I am an avid supporter and user of kefir in almost anything.

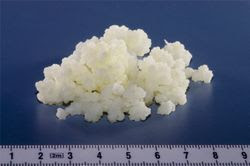
If you are asking, what in the world is kefir? Read more about it here. If you already know, read on. To the left you will see a picture of a kefir grain.

Here are a few ideas of how I use kefir on a regular basis.

KEFIR SMOOTHIES
First off, morning smoothies! I love loading up my morning smoothie packed with nutrients. It is very reasonable to make, simple, and will give you lots of energy for the day! I try to make a smoothie at least once every other day.

Ingredients I love to throw in:

kefir
coconut milk
applesauce
orange juice, concentrate
an assortment of fruit: bananas, berries, etc
little maple syrup for sweetener
flax seeds
brewer’s yeast
oils – coconut oil or olive oil

Other ideas: protein powder, oat bran, eggs (as long as they are farm fresh)

SOAKING
Another thing I use my kefir for on a regular basis is soaking my grains. Soaking is encouraged because it assists in breaking down the phytates in the grain and allowing your body to be able to digest the nutrients and minerals in the whole grains. It is a very simple process. All’s you have to do is add at least 2 Tbls of kefir to whatever flour is called for in your recipe.

For example, I am preparing rice for dinner. For one cup of brown rice, I add 2 1/4 cup fresh water and 2 Tbls of kefir. The recommended length of time for soaking rice is 7 hours. So it just takes a little thinking ahead! Once it is done soaking, I cook it as normal. Your body will now be able to assimilate the nutrition so much better!

For our regular twice a week breakfast of oatmeal, I soak 1 cup of rolled oats with 1 cup of water and 2 Tbls of kefir (or more!). I let it sit covered overnight. In the morning I put 1 cup of water to boil on the stove. When it is rolling, I add the soaked oats and let it simmer for 15 minutes or so. We then add ground flax seeds, dried cranberries, chopped apples and sometimes a little mashed bananas and there you have an excellent high fiber breakfast.

For quick breads that contain some sort of liquids (water or milk), replace up to half your liquids with kefir and soak the liquid, kefir and flour for 12-24 hours. That is the standard recommended soaking time for the best assimilation. For homemade bread, you soak the flour with the liquids, and kefir for the same amount of time.

An excellent resource with more information on the benefits of soaking, and other resources, check out this site. The benefit of this 2 stage process is described in detail here.

My favorite breakfast recipes are all soaked, including waffles, crepes, and pancakes. These recipes I have found from Sue Gregg cookbooks. I will share these recipes in upcoming posts.

The benefits of soaking definitely out way any thinking ahead preparations.

REPLACE ALL BUTTERMILK WITH KEFIR
For any recipe that calls for buttermilk or yogurt, I replace it with kefir! Works perfectly every time.

Do you have any other kefir ideas to share?

Comments { 73 }

Frugal Tips: Saving money on groceries!

1. The fewer trips you take to the grocery store the better!
Having a store just down the street is convenient, but if I make little stops several times a week, I start soaring over my budget. Once I limited my trips to twice a month with a plan I kept the costs down.
2. Make a menu and grocery list and stick to it.
Don’t just go to the store and pull things off the shelfs. This will rack you up way over your budget. I use a blank sheet of paper with traced lines to make 30 different boxes for a month worth of menus. I work in two week segments.

3. Buy in bulk.
I buy 25 lbs of oats or other items and can save a few dollars hear and there which all adds up. When they are on sale, accumulate.

Comments { 2 }