I began my own composting bin this past February using the helpful starting kit offered through Azure Standard. It is actually a very good deal and an easy way that kicked me into gear to start saving my food scraps and turning them into lovely new nutritious soil. But, you can easily set up your own bin with a few basic supplies. I have finally gotten around to figuring out a simple method of harvesting my bin as it was definitely overdue. I wanted to share a few tips with you that I have learned in the process.
Why Worm Compost?
1. No waste! You can use the majority of your food scraps (no meat or dairy) and put them to good use. Composting is all about re-using and recycling! Since beginning composting, we have decreased our garbage quantity significantly. Previously we would fill up the kitchen garbage in one week, but now we can easily stretch it to every two weeks. So it saves money!
2. Turn your food scraps into rich organic soil. If you don’t have a garden or can’t use it all yourself, this rich soil can be a great gift to a neighbor or local farmer. Your offer will not be turned down.
3. Worms are fast, efficient, and odorless. The only cause of odor in your bin will be if you add meat or dairy scraps. Avoid these products, bury your scraps well, and your bin will be perfectly odorless!
4. Worms are self-propagating. You only need to purchase worms once and then they will multiply on their own! You will have a continual supply of good rich compost.
Vericompost benefits soil by:
- improving its physical structure;
- enriching soil in micro-organisms, adding plant hormones such as auxins and gibberellic acid, and adding enzymes such as phosphatase and cellulase;
- attracting deep-burrowing earthworms already present in the soil;
- improving water holding capacity;
- enhancing germination, plant growth, and crop yield; and
- improving root growth and structure.
How to Set Up Your Worm Bin
This is one of many worm bin ideas, but it is simple and works especially well in small places. With the use of a rubbermaid container, bedding, food scraps and worms, you are on a roll! This youtube video provided an easy visual guide for setting up your own worm bin. This bin is almost exactly the same as the bin I purchased through Azure. My bin does not have the stacking feature. I have it propped up on small wood blocks over an aluminum tray to make sure it drains well, but this method looks like it would stay cleaner more effectively.
When setting up your bin, here are the supplies you need and tips to remember:
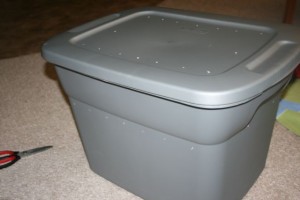
1. Tote - Make sure to select a dark tote for your composting bin. You do not want your worms exposed to excess light. They do not light light and it will dry out your bin. I use a dark rubbermaid tote (15x 10 x12) for this purpose.
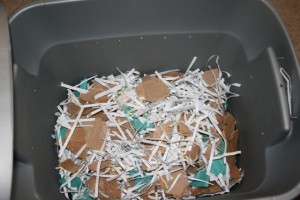
2. Bedding – You have a wide variety of bedding to choose from. Keep a good stock on hand for replenishing your pile. All forms of cardboard (toilet paper rolls, egg cartons, etc), newspaper, leaf mold (at the bottom of leaf piles) work. I had a ton of those cardboard containers from buying fruit from the market, so I tore them all up for my new bin. Simply shred them into small pieces. I like to have shredded paper on hand to keep my food scraps covered well at all times.
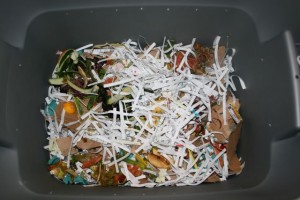
3. Food Scraps- All food scraps work with the exception of meat and dairy. Citric and onion peels and bread scraps should be added in moderation. If desired, you can blend your food scraps in blender to help them break down quicker. You can even add tea bags, coffee grinds plus filter, and egg shells to your bin. Although after harvesting my first bin, I found that egg shells did not compost well. I would recommend limiting their addition or making sure to grind them into a powder before adding. Each imparts rich calcium to your soil. Leaf and plant trimmings are great additions as well.
4. Worms – Red wiggler worms are preferred. There are many sources online for red wiggler composting worms. The best source I found was Garden Worms. 1,000 worms is a good starting place for the tote size bin. They will actually double in population in 3 months.
5. Air – Your bin needs to have good air circulation. Make sure to drill the appropriate amount of holes in your container for air flow. Make sure it is in a well ventilated room or a closet/cupboard that is opened regularly. Also, keep it lifted up on top of small wood chunks over a lid or tray to make sure it has good drainage. You can store it in the garage or deck if the temperatures are not too extreme.
6. Water – You want to keep your pile moist but not dripping wet. I keep a small spray bottle next to my bin. Each time I add food scraps, I will get a gentle sprinkling of water to the shredded paper to keep it damp. You don’t have to be too concerned about this as the food scraps have water in them as well which provides moisture.
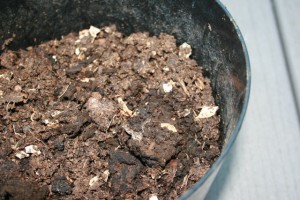
Here are some pictures as I began a new composting begin:
A few tips I have learned:
- Keep food scraps covered with torn paper. Replenish every 2-3 weeks. This will reduce excess moisture problems and also keep out the bugs!
- Rotate where you dump your scraps. Divide your container into 6 sections in your mind and rotate where you dump each time. This will keep a balanced pile being composted. Keep scraps buried under paper.
Simple Method for Harvesting Compost
Your bin should be ready to harvest in 2-3 months on average. Harvest time comes when your bin contents start looking like dark rich dirt.
1. Start a second fresh new bin (as described above) and allow to sit and rot for 1-2 weeks with your bedding, shredded paper, and food scraps.
2. Remove top layer from your old pile onto the new bin. This would be the most recent food scraps that have yet to decompose.
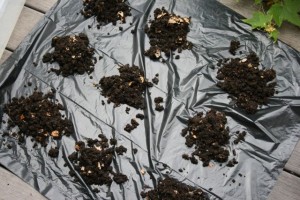
3. Lay out a black plastic garbage bag on a flat surface under a bright light or the sun. I laid it out on my back deck to prevent any mess.
4. Make nine (less or more) cone shaped small piles of compost on your garbage bag. Allow the piles to sit for several minutes. I simply made the piles and then did another task around the house while I waited, thus the whole harvesting process was scattered throughout the day. The worms do not like the light, so they will proceed to the bottom of the pile.
5. Gently remove the top portion of the pile until you see worms. Transfer this top portion to another container. After repeating the process every 20 minutes or so for a few hours, you will be left with a wiggling pile of worms. Carefully remove the worms and transfer them to your new bin, and remove the remaining compost to another container.
6. Continue through each pile as described until you have cleared them all, then proceed to make nine more piles and begin the process again until all the compost has been sorted through.
IMPORTANT! Don’t worry about getting out every single worm. There will be tiny baby worms that are challenging to remove from the debris. They will be good for your garden, so just focus on removing the larger worms to your new bin. You don’t even need to be concerned about removing all the compost. It is good to have a little of the compost in your new bin as it provides grit for the worms. So if some of the compost is still attached to the worms, don’t be concerned. The worms will just be delighted to get a new home!
7. Allow old bin to continue decaying for a few more weeks before transferring to your garden or using to make composting tea (a great fertilizer!), or giving it away (you won’t lack takers!)! Once compost is removed from the old bin, then you can start this bin over again with bedding and food scraps, allowing it to decay, so it is ready for the next harvest! This rotation between two bins will allow you to use most if not all of your food scraps effectively without any going to waste.
Give some worms away!
If you bin is anything like mine, you will have a ton of new worms. You may want to give a good handful of worms away to encourage someone else to start composting. I gave a huge pile of worms to my sister in law for this purpose.
Include your kids!
This is a fun process to do with your kids. Include them in it! Karis loved looking at each little worm, and helping me transfer them to their new home. This helps teach them the importance of good stewardship and being included in reusing and re-purposing everything in the kitchen!
Learn more…
If you want to learn more about worm composting (or vermicomposting as it is officially called), check out Worms Eat My Garbage. A great book on the topic with helpful step by step instructions for setting up your own worm bin, answering every question you may have. I learned much from this reference guide!
Other Methods…
If you have more space, consider this composting options:
Composting with A Large Garbage Can
Composting is so simple and a great way to begin reduce waste around your home! I encourage you to give it a try!
Do you have any tips and tricks to share about composting?
Just curious if you still are worm composting? We had some for a few years but recently had an infestation of small flies and gave up on the whole process. The compost tea from the worms was amazing stuff as we put it on our Christmas Cactus and it bloomed 3 different times for us. If you had any trouble with the small flies (not fruit flies) and had a solution I would be interested to hear your info. Thanks.
I live in a cold climate. What happens when the bin is full? I have nowhere to empty it because of the cold/snow outside and I don’t have a garden yet, I plan on starting one in the spring.
Thanks.
I am so thrilled to see more women taking on worm composting. It took me a little while to get over the gross factor and some 5 years later, I am now teaching worm composting classes to others. My kids love helping with harvesting. I do have one tip that will speed up your harvesting. Use pumpkin puree. The worms love it and will swarm it fast, making the trash bag harvesting even quicker. I recommend filling an avacado shell with the pumpkin puree, waiting 4-5 days then lift to find it full of worms. Keep doing that for a few weeks and you can get most of the worms from a homemade bin that way. Hope this helps.
Liz
BigTex Worms
I set up my worm compost tonight! I had begun saving scraps and grass for a compost pile when I read this post. So, now I’m doing this. I’m so excited about reusing and reducing waste as well as feeding my vegetable garden good nutrients next spring. Thanks, Lindsay!
I love my worm bin! It doesn’t stink at all, and i bought one with stacking layers. It really doesn’t require much maintenance and mine has a nice spout that you can turn to get the worm tea out. Great project!
Good idea! And I even have one of these containers left over. I bought a bunch and used them for an experimental container garden this year — they were so much cheaper AND deeper than the planters in the store. My tomatoes have been GREAT, my rhubarb (first year — from seeds) looks good, my beets & carrots look good, my beans were pretty good for 10-year-old seeds, my sorghum was great, … . Anyhow, I plan to use them again next year. But now I can maybe use my one empty one for composting.
Thanks for the good blog!
Thank you for this post, you always seem to write about things when my family needs them! I sent this link to my husband and he was very interested to read it, too, since we are expanding our garden and need better soil!
THANK YOU!
Sarah M
Thank you for this great post. I have been wanting to compost for awhile but live in very small quarters and right now cannot make use of the soil unfortunately. I am sure, like you mentioned I can find someone who can though! This is a beginners question, but it sounds like you keep the compost bin inside- is that right? And, similar to the question above, if we have limited space and need to store it outside, would that be okay? We live in very HOT desert climate (also unfortunate). I thought I have heard that this type of climate might be better for composting- is that true? Thanks!
I keep my bin inside the garage in the winter (it still gets somewhat cold but not extreme temp) and then transfer it to a closet in my house in the summer when the garage heats up to a very high temeperature. My garage is insulated, so it is a little more difficult to figure out. I think you should be perfectly fine in your situation. The ideal temperatures for them is 55-77 degrees. Bedding above 84 degrees can be harmful, but then you have to calculate that it will be cooler in the bin than in the air around it. They should be protected from freezing temperatures as well. Below 55 degrees can slow down the production.
Don’t worry about the shells not composting… they don’t break down very quickly in my compost pile either. But I actually like that, because when I plant my tomatoes in the spring I add a handful of crushed eggshells under each plant. The extra calcium helps the tomatoes from getting blossom end rot. You can also rinse out the shells really well, crush them, and store them in a bag in the freezer until spring.
Hi Lindsay. I have a couple of questions. One, how often do you physically go put scraps in? Is it after every meal or do you collect them for the day? Also, how many scraps can they really handle? I have a four kids and we have another family of 5 that has lived with us for a while. I figured that if I did two bins at a time for now, I could always just send one of them with my sister-in-law when she moves out. But I guess what I am getting at is, is two bins really enough for a the scraps from 11 people or should I have even more?
One more question? Can it sit too long? In other words, can it make it through the winter or do you have uses for it during that time period?
Thank you so much!
I keep it pretty easy. I store a glass quart covered jar near my sink and under my sink to collect the daily scraps. You really could use any small covered container for the job. When it is full, I make the trip to the compost bin. I do this usually at the end of the day after cleaning the dinner dishes, or every other day. With your size family, you will just have to cut back on how much you will be able to give them. No, you probably do not want to give them all your food scraps. The basic recommendation for 1000 worms is 1/2 lb of food scraps per day. You don’t want to overfeed. You will be able to use the majority but not all your scraps. If you want to use all, you will have to set up a larger bin. Yes, you can leave the compost through the winter, but it is just as easy to transfer it to the garden pretty quick or pass it on. Hope that helps!
This is a great post filled with a ton of info. I always feel so guilty just throwing out peelings and veggie scraps into the trash! I had read a bit on worm composting a while back, but decided against it because I can’t keep my container inside and without a garage, and freezing temps here in the winter, I thought the worms might not survive…is this true? Also, I am a bit squirmish…I know, living in the wilderness, you need to be a bit more connected to nature, but tomato hornworms and beetles scare the daylights out of me sometimes…so how do you do with touching all the worms? Or maybe that is a job I could get my son to do. hummm. thanks for such a great post! Abbie
Abbie:
I have to say, I started composting because I was squirmish about worms. I really wanted to dump them in the bin when I got them but couldn’t do it (my husband and boys enjoyed it). Now that I have had my bin for a few months, they don’t bother me at all anymore. It really has helped.
I didn’t like the idea of the worms at first either, but when I finally decided to attack the pile to harvest, it really wasn’t that bad after all. You can use gloves if that helps…but it actually turned out kind of fun to get my hands dirty with them.
This looks so easy. I have been composting in a ditch (that I dug my very own self) in the back of our yard. I daydream about having a bin that I don’t have to trek out to. Also, I learned that you don’t have to buy the worms if you compost in the ground bc the worms will come. So when I get my bin, I know exactly where to find the worms for it!
One question: How do you turn and water your compost? Do you keep it out in the sun?
You don’t have to worry about turning your compost in this small of a bin. I spray it with a water bottle just lightly every time I add my food scraps. I store mine in the garage in the winter and in a hallway closet in the summer when it gets too hot in the garage.
Hey! I saw your twitter the other day about the egg shells not breaking down well. Were you rinsing and pulverizing them before adding them to the compost? I’ve read that they break down more easily if you crush them first. You could do in your hands, or by laying the shells between 2 sheets of wax paper and rolling over them with a rolling pin.
I only crushed them between my fingers previously. In the future I will definitely pulverize them more. Thanks!
awesome!!!:D