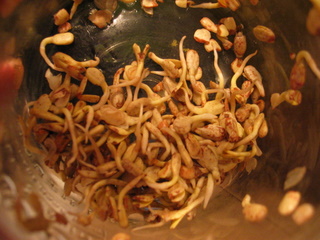
My sunflower sprouts – aren’t they cute?
Sprouts are a wonderfully nutritious and frugal way to incorporate good nutrition into your diet! They are a great alternative to expensive nuts or to replace lettuce when the greens are not in season. Sprouts can be added to so many dishes with great success, including salads, soups, sandwiches, omelets, and breads. Seeds actually increase in nutritional content when sprouted! Sprouting is a simple, indoor method of gardening…for anyone!
Lately, I have been exploring sprouting sunflower seeds (read more about the wonders of these seeds here), and it has been so much fun! These are packed with all the nutrients we need for survival, and receive vitamin C when sprouted. They are so cheap and easy to sprout! My frugal tip of the day: learn how to sprout seeds!
How to Sprout
This method can be used for sprouting grains, seeds, and beans, but I am focusing on seeds, as that is as far as I have gone as of yet.
1. Buy a small amount of seeds at your natural foods store. Purchase raw, and labeled for sprouting. Store your seeds in your refrigerator until you’re ready to sprout them. They go rancid very quickly. All seeds should be stored in this way.
2. Start with sunflower seeds, as they take the shortest amount of time and are ready in two days! Take about 1/4 cup of seeds. Pick through them and discard any split, discolored, or damaged seeds.
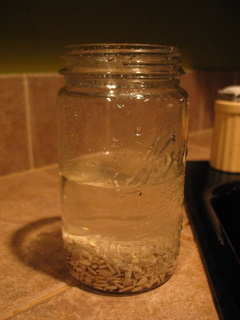 3. Soak the seeds for several hours before placing them in the bottom of a quart size glass jar. Cover the seeds with cold water that is at least three times the volume of the seeds. Leave jar uncovered and unrefrigerated. Let the seeks soak for at least 6 hours, but no more than 12 hours – overnight is probably most convenient. (See picture to left)
4. In the morning, drain the water from the jar without pouring out the seeds. You can use cheesecloth, a small strainer (pushed concave into the top of the jar), nylon netting, or a cloth napkin (as I did!). If using cloth, secure with a rubber band.
5. Rinse the seeds well. Let cold water run through the cloth and into the jar. Swirl the jar to swish the seeds around in the water, but be gentle – they have tender shoots. Pour out the water and repeat once or twice. Hold the jar at an angle for best results (see picture at right). Drain well, so seeds do not get moldy.
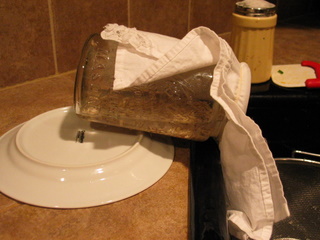 6. Keep the jar on it’s side, or leave the jar at a slight angle so the water can continually drain out. Seeds should be spread through the length of the jar and not crowded together at one end. Let the jar remain until you rinse again. Best to keep them in a warm dark place. (I keep it at my sink propped up by a plate so it is continually draining and prompting me to rinse again!)
7. Rinse and drain as in step 6 twice a day. Keep my your sink to help remind you! Seeds should sprout in 2 days (mine took longer, due to the colder temperature in our house). Store in refrigerator until ready to use…ground or whole!
I am still in the learning process, but so far so good! I have enjoyed tossing these in salads, grinding them for our breakfast cereal (including Karis’ porridge), and adding them to smoothies!
Great article. I am an amateur at sprouting myself but I’m determined to get the nutrition sprouts offer into my diet.
Last week I went to a local farmers market and there was a lady there that sold a sprouting lid to a large mason jar. She said it’s how her grandma taught her to sprout. I’m trying it right now. It’s all the same process as you’ve explained above but with a screw on lid. I’ll let you know what I think. If it works I’ll find her contact info for those interested. The lid was under $5.
HI – I know your post is coming up on a year old, but thought I would comment anyway.I just started the soaking last night and rinsed. very exciting. thanks for your information and great photos. All I could find was a “zesty” sprouting seed mix and that should be fine. I have poured the unsed seeds into a glass jar – is that an “ok” way to store them? nothing on the package to give me that type of info. thanks again, Emily
Thanks so much for all the pictures and step-by-step info. You’ve explained it so well. I’ve tried sprouting sunflower seeds before the sprout didn’t grow beyond even an eighth of an inch. I know they were raw, but they were not labeled for sprouting, and they had been in my cabinet a few months (not the fridge). Armed with all this information though, and seeing how great your sprouts look, I’m definitely going to try again.
Funny you should write about sprouting this week- I just wrote a post about sprouting grains, and also legumes and seeds, a couple days ago. Personally, I haven’t done much with seeds yet, although that is my next step. For now, I have done a lot with different kinds of grains, as well as chickpeas and lentils.
I like your idea of just using the cloth napkin. Did it seem to drain well enough? I was just planning to cut some mesh to fit a jar, but maybe I will give the cloth a try first. Thanks!
I actually take the cloth napkin off to do the real draining, and use the bottom side of a strainer/colander. Then I replace the cloth napkin, tilt it up, and let any remaining drain out. this method works well! I have tried draining directly with the cloth napkin, and it works fine most of the time.
I also sprout!
I bought a double layer sprouter from Urban Homemaker that I love. Once the seeds are sprouted in it, you can use it as a vented container in the fridge.
I’ve sprouted wheat berries too, and it is just as easy.
Hmm, I keep telling myself to start sprouting my seeds…and that surely it isn’t hard. Thanks for writing this out. Like most things, this doesn’t look hard…it’s just a matter of doing it! And I think it would be fun to watch the process of the seeds sprouting!