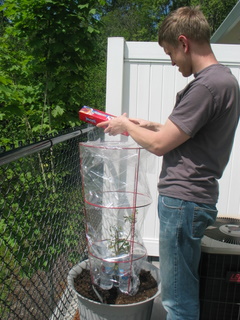
 It was such a joy to start my own garden on Saturday! There is definitely something fulfilling in planting your own food. Since I was really nervous in the whole preparation process, I was surprised to find it so enjoyable to actually set to work and do it! Now I wish I had planted more than my four cute tomato plants, but then space is limited, and I am taking baby steps!
Okay, so I am no expert…let’s get that straight! In fact, this is the first year I am attempting to grow my own garden of sorts on my back deck, but I do have some tips and tricks to share from our local farmer. And he guarantees success! ![]()
1. Get a good cage! Wherever you plant, you will want a solid metal cage to secure and uphold your load of tomatoes.
2. If planting in ground, put down mulch where you plant. Use black trash bags – it will trap more heat for the roots.
3. Strip off the bottom 4 inches of branches and plant the plant 4 inches deeper than it is in the pot (the disposable container a tomato start comes in). You want to plant it pretty deep, a lot deeper than you would naturally think.
4. At the bottom of your hold put a handful of sweet lime/calcium and a handful of fertilizer, then cover with a little dirt.
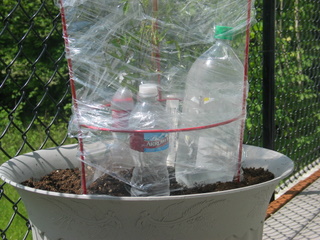
5. This is the biggest tip! Place two or more large 2 litter plastic containers (or as many small containers as you can scrounge up), and fill them with water. Seal them with the caps on and place them as close to the stem of the tomato plant as possible.
 6. Wrap your cage with saran wrap! Yes, that’s right! Plastic wrap! (This is the one thing I decided to make an exception for to buy plastic wrap for the cause, as I honestly don’t use it anymore!) The whole idea is to create a green house effect, and keep your roots warm, especially at night. If you’re anything like me, I did a terrible job getting a tight rap around my cages, so I let my husband do it…his expertise came to the rescue! His advice: Start at the top and work down! Two layers is even better!
7. Make several ventilation holes on the top and around the side with a knife or something else.
8. Water your plants at night – avoid getting your leaves wet…for that is when they grow, and another reason why you want to keep them warm.
My plants have already grown quite a bit since Saturday! We’ll just have to stay in touch to see how successful these little tips are this year!
It’s not too late to plant tomatoes! At least around here they say you can plant them up through the first week of June!
Hi, I’ve grown tomatoes for many many years now. I just wanted to add that mulch around the plants will not keep them “warm”. Mulch or plastic will trap in moisture…
Last year I tried cherry tomatoes in my garden, with good results. This year I will try some of your great tips. Thank you for sharing this information.
here are a few tips to make tour tomatoes thrive.first,i always prune the first sets of blossoms so the plant can have more time to grow larger.this will give them more time to put thier energy into growing larger instead of producing fruit.Next, when they are large enough and start to set blossoms use a bloomburst fertilizer or if you want to go organic bury some left over bananna peels under the mulch. the potassium and phosphorus will work wonders and you will set more blossoms.and remember that tomatoes are self pollinating so when blossoms appear vibrate the blooms by tapping the cage vigorously or using a sonic vibrating toothbrush around the blossoms to mimic a large bumble bee.i get almost 100% pollination by doing this. take left over dried egg shells and grind them in a herb or coffe grinder and sprinkle the dust under the mulch to give calcium and avoid blossom end rot.I use a constant drip system to keep my plants from drying out. this is great because if the plant get too dry then calcium cannot be taken in by the roots and you will get blossom end rot. and by not watering alot all at once you avoid splitting and your tomatoes will taste better because the flavor will be more conscentrated and not watered down.good luck and happy growing!
Great tips! I’ve been growing heirlooms for years. I always start mine from seed, that is even more gratifying! Lately, I’ve seen some locals using the plastic wrap, I’m going to try it next year.
Here’s another tip for all of you. If your plants get so big that even sturdy cages topple over, I’ve gone to our local building supply and bought some re-bar. They even cut it for me into approximately 5 foot sections. I intertwine the rebar through the levels of the cage (to make sure it helps with both directions) and hammer the rebar into the ground. I’ve had HUGE plants with HUGE yeilds, and occassionally the cages turn to the side a bit, but have never fallen over, even with big storms! Not EXTREMELY costly, but extremely effective!
(another side note, for great heirloom tomato seed selection, visit tomatobob.com, that’s where I get mine!)
Congratulations on your garden! Growing your own foods is definitely exciting.
Last year we tried out a tomato-growing idea from a friend and it worked fabulously: the tomatoes were planted in one side of a cinder block and we filled the cinder block’s other hole with slow-release, organic fertilizer. It worked great!
I told a friend about your great ideas for the tomato plants and she advised me against the plastic water bottle because of trying to go organic, the plastic would release toxins into the soil. Is this a problem?
That’s a good question, Autumn. I will ask the farmer, but he raises all natural heirloom plants (which are the ones I purchased), so I trust he wouldn’t advise anything that would be harmful as such. I wouldn’t imagine that would be such a huge issue, because it really is only the bottom of the bottles that is just resting on the top of the soil.
Wow! For a beginner gardener, you sure do your research. You have me wishing I liked tomatoes! I will definitely be back to see how they grow. We are trying green beeans, carrots, baby lettuce and chives this year. My post on WFMW is kind of the opposite of yours—my perfect garden is a bit different!
Maybe I’ll try a tomato plant too. I do like bruschetta…
Some great tip here on how to produce tomatoes. Providing your plants with water should really be a daily routine making sure that you dont over water them but just prevent them from drying out.
Wonderful tips–Thank you.
Julieann
How often did the guy say to water them? The lady at Shorty’s said to water once a week…??
Really? I guess it just depends upon how much rain we get. I was told to water them at night (once a day), but with the rain we have been having, the dirt has stayed pretty moist on its own. I would imagine in the summer your plants would dry up with only once a week watering!
I read your blog after my kids and I planted tomatoes yesterday. Great tips. I’ll have to get a tomato tower thingy this weekend and try not to forget the plastic wrap. I live in Alabama, so it usually stays pretty hot here. My kids were up bright and early today to see if there were any tomatoes yet. We’re working on patience.
What are the sealed water bottles for? Do you puncture holes in the bottom so they will water it continuously? Thanks for the tips!
The water in the water bottles heats up and provides the green house environment.
THE SUN REFLECTS THREW THE WATER TO MAKE IT WARMER
Wow, I’ve never seen this done, but with our cold spring, it might be worth it!
Our tomato plants get so big, even cages like yours tip over. We’re going to make some super-strong ones with leftover wire fencing and some metal fence posts.
I bought some heirloom plants, so I’m very excited to see how the fruit tastes later this year.
Thanks for the tip. I’m about to go get some Saran Wrap!
Interesting ideas. We planted ours quite a while ago and I wasn’t sure they were going to make it since it snowed after we planted them…they look well, though, so we’ll see if they produce well. I think I’ll try the green house effect to see if they’ll grow faster. Thanks.
Those are some great tips. The whole green house idea is great for the northern climates. Those of us in the south don’t have any trouble keeping our roots warm. A nieghbor I had, told me about planting the plant much deeper than you think you should, like you said. It is a great tip. I gives you a better root system. We have about 14 different tomato plants this year. We love tomatoes. They are a great gardening start.